[ad_1]
A few winters ago, while hiding from the weather, I decided—not for the first time—to learn about producing 3D images. Although I doodle and took art classes in high school, my drawings are not anything special, and my previous attempts to draw with a mouse or trackball have been disastrous. The only open source software that I had heard of that could produce fantastic 3D work was Blender, but I thought I would need a steadier hand than I possessed and a Wacom tablet. So, what could I try instead?
I had written code in a variety of programming languages to produce circles, pie charts, sine waves, and the like. So, with that in mind, and a little experience producing 2D shapes by writing raw SVG, I looked for open source software that would allow me to describe 3D shapes with a keyboard rather than draw them with a mouse.
Getting started with POV-Ray
A raytracer is a program that creates 3D images by mathematically predicting where rays of light will strike an object, where they will either be reflected or absorbed. POV-Ray (Persistence of Vision Raytracer) generates images from a text-based scene description. And, looking at the POV-Ray Hall of Fame reveals the amazing photo-realism and surrealism that the program is capable of producing.
Additionally, POV-Ray can—with a little help—become a data visualization tool in the same way that many spreadsheet programs and other applications are used to generate graphic representations of raw data (e.g. pie charts, bar graphs, etc.). Because POV-Ray images are generated from scripts, other applications could be used to gather raw data and format it into scripts that could then be used by POV-Ray to generate the final images.
Linux, Mac OS X, and Windows binaries are available.
After reading the POV-Ray tutorial that explains how to create basic shapes and join them together, I was able to produce a simple seven second animated video.
Lights, camera, objects
In order to achieve 3D realism, the viewer must be able to see light and shadow behave in a credible way. The tutorial begins by explaining how to position a “camera” to represent the viewer’s point of view, a shape to be looked at, and lighting to simulate the reflections and shadows cast by the shape.
The tutorial then describes the basic 3D shapes: sphere, cylinder, cone, box, and torus (i.e. doughnut). These shapes can be combined by overlapping them and taking the union (logical OR), intersection (logical AND), or difference (logical XOR). Using these techniques, one can, for example, create a “half-torus” by obscuring a torus with a box. Joining cylinders to each side of a half-torus, and adding another half-torus rotated 180°, results in a chain link. Multiple links rotated 90° from each other, and properly offset can form a chain.
The tutorial also talks about textures, but for a beginner such as myself, producing textures like “wood” and “sky” was rather complicated. Fortunately, POV-Ray provides macros for a number of pre-built popular textures.
Here’s how I created an object and an animation.
Hello, Sphere
Save the following code as a file named HelloSphere.pov.
// Annotated example from POV-Ray tutorial
// http://www.povray.org/documentation/3.7.0/t2_2.html#t2_2_1_6
//
// Generate PNG with:
//
//   $ povray +IHelloSphere.pov
//

#include "colors.inc"  // Include color name macros

background  color Cyan

// Lights!
//
light_source
  <2, 4, -3>           // X, Y, and Z coordinates of the light source
  color White


// Camera!
//
camera
  location <0, 2, -3>  // X, Y and Z coordinates of the camera
  look_at  <0, 1,  2>  // X, Y and Z coordinates of where the camera is aimed


// Object!
//
sphere
  <0, 1, 2>, 2         // X, Y, Z and radius of the sphere
  texture
    pigment  color Yellow
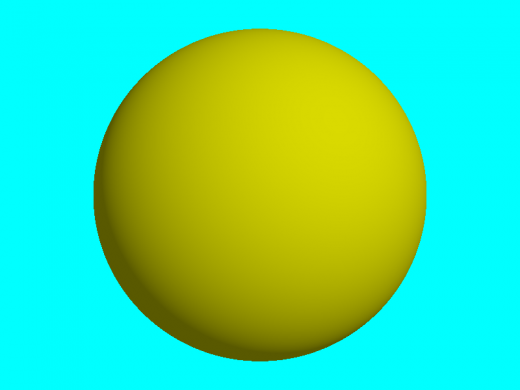
Issuing the command povray +IHelloSphere.pov in your favorite shell generates HelloSphere.png shown below.

Action!
I didn’t initially set out to animate my experiment, but in poking around on the POV-Ray wiki, I found two articles that indicated it wasn’t particularly difficult: HowTo:Create animations and HowTo:Encode animations as Ogg Theora Video.
To create animations, POV-Ray provides a “clock” that generates multiple frames and saves each one as a PNG file. For each frame, the animator can move the object, the camera or the lighting, or a combination of all three. Once the frame files have been created, they must be combined into a single movie file. Although there appear to be several applications that help produce video, the wiki article recommended two programs which may not be available for Windows or Mac OS X: png2yuv (supplied by the mjpegtools package) and ffmpeg2theora (supplied by the ffmpeg2theora package).
Together these two bundle the individual stills and produce an Ogg video.
The following code, added to the end of a POV-Ray script, reads a value from a clock and generates a frame for each clock tick, both rotating the camera around a scene and rotating an object based on the clock value.
// Animate!
camera
  look_at  <0  10, 0>
  location <-35*sin(radians(clock*2)), 10, -35*cos(radians(clock*2))>


#declare Angle = 0;
#switch (clock)
  #range (0, 44)
    #declare Angle = clock;
  #break
  #range (45, 134)
    #declare Angle = 45 - (clock - 45);
  #break
  #range (135, 179)
    #declare Angle = (clock - 135) - 45;
  #break
#end
Rotate_Around_Trans(<Angle, 0, 0>, <0, 25.5, 0>)
In order for the animation to work, a second file, (flying.ini) controls the clock:
Input_File_Name=flying.pov
Initial_Frame =   1
Final_Frame   = 180
Initial_Clock =   0.0
Final_Clock   = 179.0
Using the flying.pov file, which describes the shapes and scene, and the flying.ini file, which describes the number of frames and clock rate, the following generates 180 PNG images, and stitches them together into an Ogg Vorbis video:
# Generate the 180 PNG images
povray +Iflying.pov flying.ini

# Create a YUV video from the PNG images (stills)
png2yuv -I p -f 25 -j flying%03d.png -b 1 > flying.yuv

# Convert the YUV video to an Ogg Vorbis video
ffmpeg2theora --optimize --videoquality 10 --videobitrate 16778
              -o flying.ogv flying.yuv

# Remove the temorary files generated above
rm flying0*.png flying1*.png flying.yuv
The code
- flying.pov: The code to produce the initial image by describing the shapes, textures, lighting, and camera movement.
- flying.ini: The code which provides the “clock” and “frame rate” for the animation.
- film.sh: A short Bash script that issues the commands to “compile” flying.pov and flying.ini into a series of PNG frames, and then combine those frames to produce a movie.
The image
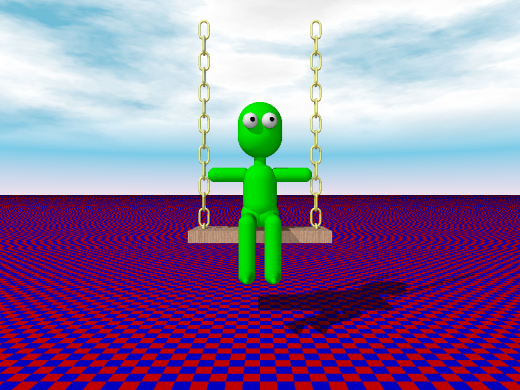
The command povray +Iflying.pov produced flying.png:

The movie
- flying.ogv: The resulting Ogg video. It plays well in Firefox, Chrome, and Android phones; other browsers may require an Ogg plug-in to play. Or, just take a look at the uploaded version below.
[ad_2]
Source link