[ad_1]
In this article, I’ll explain how to get started with QtCAM, open source Linux webcam software. QtCAM has more than 10 image control settings, displaying frame rate achieved, color space switching, and extension settings. With these features and its user-friendly interface, QtCAM might be the right choice for your Linux webcam software needs.
QtCAM source code is available on GitHub under the GNU General Public License.
Installing and launching QtCAM
On Linux, you can install QtCAM from the source code available on GitHub. For installation in Ubuntu 12.04, run the following commands in the terminal:
$ sudo apt-add-repository ppa:qtcam/precise
$ sudo apt-get update
$ sudo apt-get install qtcam
To launch QtCAM in Ubuntu, run the command $ sudo qtcam in the terminal.
Features
QtCAM features include:
- enumeration and selection of camera device
- still capture
- video recording
- camera settings
- extension settings
Enumeration and selection of camera device
The application will only emulate USB devices connected to the system. The list of connected devices (you can connect up to a maximum of six cameras) is displayed in the “device connected” combo box. You can select any of the connected cameras and the corresponding preview will be displayed.

Preview will not be displayed if the camera is busy (i.e., it is opened by another application, such as Skype) or if there are two instances of QtCAM and both have the same camera selected.
Still capture
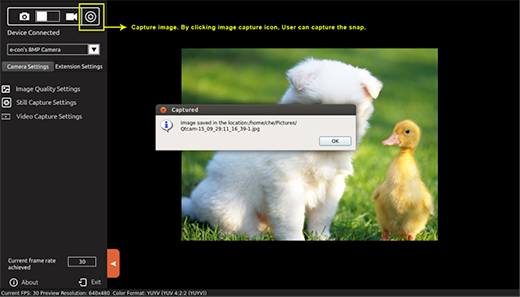
By default QtCAM will open in still capture mode; clicking on the camera icon also switches it to still capture mode. To capture still images, either click on the capture image icon or on the preview. The image will then be saved in the directory path selected in the image location available under the Still Capture Settings menu.

The default name format for the captured file will be QtCAM-YY_MM_DD:hh_mm_ss-x plus the image extension format selected. “x” refers to image number updated when multiple images are shot within a second. The supported image types are JPG, PNG, BMP, and RAW. All image resolutions supported by the connected USB camera will be displayed.
Video recording
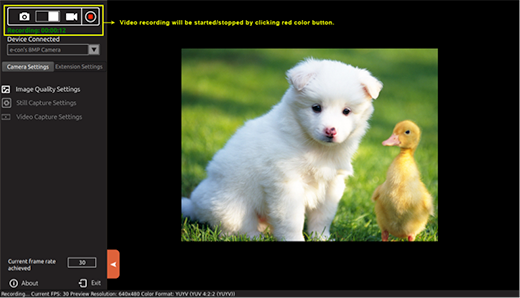
After you switch the application from Capture Mode to Video Mode by clicking on the video icon, you can record videos or see their preview. You can select the required frame rate, video color space, preview resolution, video encoder format, video container, and the location during the preview. Above the About menu is the Current Frame Rate Achieved feature, which displays FPS achieved. Select the record icon available in the sidebar to start and stop recording and the video will be saved in the directory path selected in the video location available under the Video Capture Settings menu. During video recording, you cannot change the preview resolution and camera device.

The default name format for the recorded file will be QtCAM-YY_MM_DD:hh_mm_ss, plus the video record extension format. The supported video formats are .mkv and .avi and the supported encoder formats are YUV, MJPEG, H264, and VP8.
Camera settings
Select Image Quality Settings in the sidebar control menu to display all the available camera control settings. Sliders are used for all the control menus and, depending on the camera connected, the control menus vary. Those controls that are not supported by the connected camera would be grayed out and you will not be able to configure them. Based on the position of the slider marker, the value set will be displayed in the text box next to it. The preview will also change according to the values, and you can adjust the sliders until you reach the desired output.
The various controls on the application include brightness, contrast, saturation, white balance, sharpness, gamma, gain, exposure, hue, power line frequency, and focus.
Extension settings
Some cameras might have additional controls and/or features that are not included in the standard UVC controls, such as various focus modes, reading focus positions, controlling general purpose I/O pins, and selecting flash and torch modes, which are listed under Extension Controls in the Extension Settings tab. (This setting, however, is applicable only for e-con‘s range of USB cameras.)
Hardware default
To reset all the changes you have made using the Camera Settings menu, click on the Hardware Default button under the Image Quality Settings menu and all control values and the preview will be set to the default mode.
Firmware version
The current firmware version running on the camera could be seen by pressing this button at the end of Camera Settings menu.
Hot keys
- Pressing I on the keyboard captures the image.
- Left and right arrow keys open and close the sidebar, respectively.
- The Tab key can be used to navigate between menus.
Now you should be ready to get started using QtCAM. Let us know what you think of the program in the comments below.
[ad_2]
Source link