[ad_1]
We’ve all seen the cute cat GIFs and the funny GIF memes. But, making your own photo-based GIFs is a great exercise and can be a fun way to spice up your photography work without having to dive headfirst into video.
GIFs these days have a reputation for being silly or snarky tools for responding to people when words don’t quite cover it. And while those uses are absolutely excellent (I am a big supporter of communicating via GIF), there are other slightly more serious reasons to create a moving image from still photographs.
Why GIFs?

A current series that I am working on involves photographing artists creating in their studios. I want to give a behind-the-scenes look into how artists work, especially highlighting how they make their studio spaces their own. All of the sessions are written up and shared on my blog, with details of their art and craft. After completing the first few sessions, however, I felt like I needed something extra. I considered video but really didn’t want to deal with switching back and forth between still images and video, let alone all the other pieces that go along with video work.
The happy medium for me was a photo-based GIF. I could have the look and feel of a short video clip without juggling more, and it would also be easier to share on certain platforms. A GIF in this situation added some life and variety to a series of still images, which is exactly what I was after. It also allows me to better describe and document certain types of movements and actions, something that has been very useful.
Taking Images for a GIF
The first step of the process is, of course, choosing a subject and taking the images. I am drawn to more subtle motion for my GIFs (and work in general, as I mentioned in my last article), but really, any type of motion will do. Having a fast shutter speed to freeze that motion is important, but otherwise, there isn’t really anything special about what you can take photographs of to make a GIF.

You can shoot in raw or JPEG, whichever makes the most sense for your workflow. I shoot all my images in raw, including ones for GIFs, because I edit them first. While shooting, the key is to use burst mode on your camera and take a sequence of images of action. The number of images you take is up to you and also depends on the situation, but keep in mind that too few images will result in a GIF that will be too short and quick and won’t show much. I try to aim for 20-30 or so in a single burst, but mostly just do what feels right in the moment (I know, a terrible answer for a tutorial). I created the GIF below from just six images, which works okay given the type of movement I’m capturing; however, it likely would have been better with more frames.

You also want to make sure that the images are taken quickly so that there aren’t big gaps in between movements, as that will result in a jumpy-looking GIF. Lastly, holding the camera steady or even using a tripod will help create better GIFs in most circumstances. You want the subject’s movement to be the focus, not necessarily shifts in the background or setting. You can choose to align layers when loading files, but that isn’t foolproof, and it is best to keep the camera as steady as possible while shooting.
How to Make a GIF in Photoshop
Once you have a burst sequence of images, the next step is to edit the images, if you so desire. You can, of course, create a GIF with unedited images, so this step can be skipped. I have my own preset for my work in order to keep it consistent and want my GIFs to stay true to that, so I edit them all in Photoshop first and then save them as JPEG files. After that, the process of creating a GIF can actually begin.
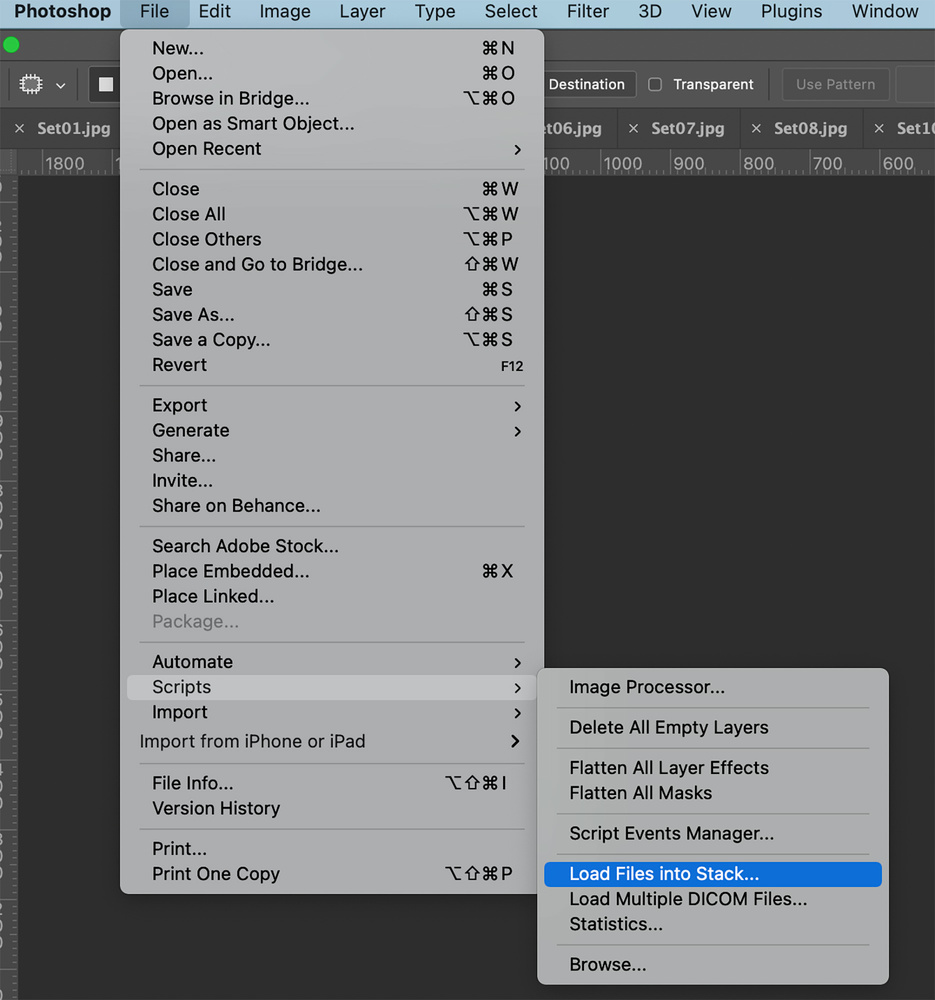
First, go to File > Scripts > Load Files into Stack and select the images that you want to include in your GIF. Once the images are all loaded, you will need to make the Timeline window visible, if it isn’t already. To do this, go to Window > Timeline. Then, when your Timeline window is there, simply click the box in the middle that says “Create Frame Animation.”

This will put a single frame in the timeline, so you will need to add the rest. To do this, click the three lines on the top right of the Timeline window and choose the Make Frames From Layers option.

You should now have all of the images in your timeline. At this point, you can click play to see your animation! The main thing that is left before saving is to choose the delay between frames, which will determine how fast or slow your GIF will play. I actually vary this depending on the GIF, as some seem to call for less delay and some more. But in general, somewhere between 0.1 and 0.2 seconds works best for my liking.

The very final piece, other than exporting the file, is to double-check that it is set to loop forever. Photoshop should default to this, but you will want to verify so that your GIF can keep going and going, as they should.

Exporting a GIF
Once you have your GIF fully made, it’s time to export it so that you can share it with the world! To do this, go to File > Export > Save for Web (Legacy).

Then, you will want to choose GIF 128 Dithered as the preset. My preset was set to lower in the Colors option, which won’t look as nice, so you will want to bump that up to 256 for a crisper animation. The image size is going to depend on where you are sharing and what you want the file size to be, so you will need to use your judgment on that. That said, smaller (within reason) is generally better, due to how high GIF file sizes can get.

 And there you have it! A quick and easy way to make GIFs from your photographs! As a parting thought, Instagram does not support GIF files, so if you plan on sharing your GIF there, you will need to convert it to an MP4. There are lots of free converter options out there, so no need to stress about that!
[ad_2]
Original Source Link