[ad_1]
Being a 3D artist used to mean that you were exclusively a digital artist—you worked in a virtual environment with intangible materials. The result of your work was destined to be seen only in print or on screens. Even in a virtual reality (VR) environment, the result is, at best, an illusionary representation of your three-dimensional work. 3D printing has changed that.
3D printing has given 3D artists the ability to bring their work into the real world where it can be seen, held, and used. Not only that, 3D printing also brought digital tools to people outside of the typical 3D art community. Traditional sculptors, jewelry designers, makers, and backyard tinkerers understand the incredible amount of freedom and power that 3D printing brings to their work.
Of course, 3D artists aren’t always used to working in real-world units and the constraints of meatspace materials (which may or may not, in fact, be made of meat). Likewise, for our non-digital counterparts, powerful 3D art tools such as Blender can prove to be daunting and unfamiliar territory. Hopefully, this two-part article can help bridge that gap.
Getting started
There’s not enough room in this article to walk you through all of the basics of getting started with Blender. There are great video tutorials and books (shameless plug) out there that are more thorough and better suited for that particular task. However, assuming you know your way around Blender a little bit, there are a few setup tasks you should go through when starting a project meant for 3D printing.
Use real-world units
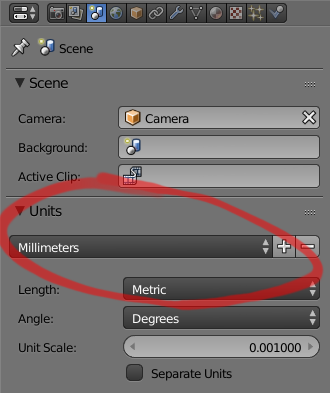
Your 3D model is destined for the real world. To that end, you need to use real-world units. By default, Blender doesn’t use real-world units. Instead, it uses the nebulously sized Blender Unit. You change this value by going to the Units panel in Scene Settings. Most of the specifications for 3D printers (or commercial 3D printing services) are in metric units. For that reason, I recommend setting your units in Blender to use millimeters as a base.

Set your units to millimeters
Don’t worry if you—ahem—happen to be in a part of the world that hasn’t fully converted to the metric system. You can work in inches if you like. In fact, here’s a little-known tip: Even if your base units are metric, you can still use notation for inches in your sizes. For example, if you type 1" or 1 in as the X dimension for the default cube, Blender will automatically convert that to 2.54cm for you if your base units are metric. The reverse is also true.

Blender can do imperial/metric conversions for you.
If your primary purpose for using Blender is for 3D printing, you may want to save this as part of your default configuration (Shift + U or File→Save Startup File).
Create a boundary guide
Do you have a 3D printer of your own (or a generous buddy)? Are you going to use a commercial 3D printing service? In either case, knowing ahead of time where your 3D object is going to be printed and in what material is usually a good idea. This lets you know how much detail you can have and, more importantly, it lets you know the available volume you have to work within. Think about it like printing on paper: Are you working on a business card or a billboard? You want to know how much space you have available to work, and the amount of detail you can use in that space, and it’s the same when printing in 3D.
If you know the specifications for your printer—or the place you’re printing—you can use a cube as a simple guideline to show you how much space you have available. Let’s say you’re printing on an Ultimaker 2+. The specifications for the base model list the build volume as being 223mm x 223mm x 205mm.
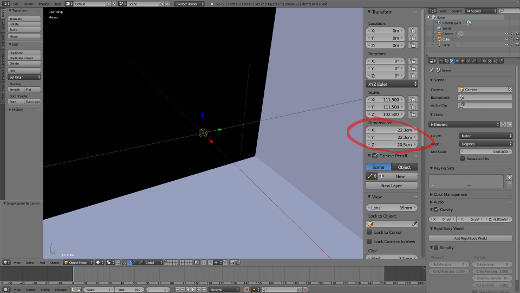
Assuming you’re working in Blender’s default scene and you’ve already set it to use metric units, select the cube already in the scene in the 3D View. While still in the 3D View, go to the Properties region (you can toggle the region’s visibility by pressing N). In the Transform panel, there are X, Y, and Z values under the label of Dimension. Enter the width, length, and height dimensions for those values. In our example, that would be 223mm, 223mm, and 205mm, respectively.

Set the dimensions for your reference cube
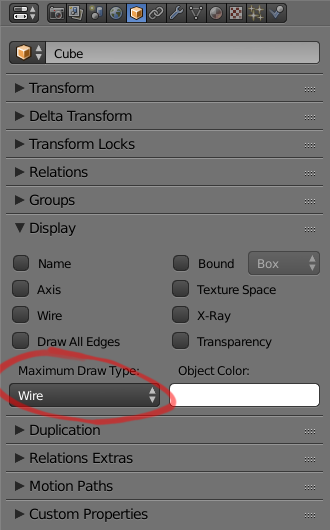
If you haven’t adjusted the 3D View, it should appear that you’re now inside the cube. Scroll your mouse wheel to zoom out far enough that you’re back on the outside. Now, as nice as this cube is, it completely blocks your work area, so it’s not great as a reference yet. Fortunately, you can fix that with a few small adjustments. First, go to Object Properties. At the bottom of the Display panel is a drop-down menu labeled Maximum Draw Type. By default, that’s set to Textured. Change it to Wire. Now, regardless of what view mode you’re using the 3D View, that cube will always show as a simple, unobtrusive wireframe.

Set the reference cube’s draw type to Wire
There’s one more nice little touch worth adding. While you’re working on your 3D-printed object, you may accidentally select your reference cube. Worse, the change to the maximum draw type in the 3D View doesn’t affect rendering. That means that if you do a test render to see what your finished object might look like, your reference cube is still there, visible as a solid cube, likely blocking your view. Fortunately, both of these little annoyances are easy to fix from the Outliner.
In the Outliner, find your reference cube. Again, assuming you’re working from the default scene, it’s probably named Cube. In fact, you should probably fix that. Double-click the cube’s name and rename it to something that makes more sense, like reference_cube. (Lower case and underscore aren’t necessary. Just an old habit of mine.)
Now, to fix those other issues, look to three icons on the far right of your reference cube’s name. There’s an eye, an arrow, and a camera. The eye icon controls visibility in the 3D View. You want to keep that enabled. The other two, however, control selectability in the 3D View and visibility during render. Disable both of those by left-clicking their icons. (Tip: You can do both in one go by left-clicking and dragging your mouse cursor over both. It’s just like clicking each individually, but faster.)
Hide the camera, delete the light
This last little bit is just a personal preference of mine to try and de-clutter the work area a bit. Outside of possibly doing test renders to get a more realistic approximation of what your finished print looks like, you’re not going to have a lot of use for the camera and lamp objects that are in the default scene. For the most part, they’ll just be in your way. To that end, it’s best to get them out of your way.
Now, you could just delete them both and let that be that. However, I like to keep the camera around just in case I do actually want to make a test render. So rather than delete the camera, I simply hide it from the 3D View. You can do that from the Outliner as described in the previous section, or you can select the camera object in the 3D View and press H to hide it. Then when you need it again, you can simply unhide it and put it in the best place to give you a nice render.
The lamp object, on the other hand, I would simply select and delete (X). I have a few of my own pre-built lighting rigs that I prefer over just a single point lamp. When I want those, I append them to the scene. Since this is for 3D printing, I’m not likely to be doing a lot of rendering anyway. Removing the light removes the temptation to waste time trying to make a pretty render.
On to making
Now you have a good base scene to start working on your 3D printing project. From here you can import another 3D model as a base or start working on a new one from scratch using Blender’s excellent modeling and sculpting tools. The next part in this article will cover a few of the tools built into Blender that can help ensure you have the best results when you get to printing.
[ad_2]
Source link