https://i.ytimg.com/vi/CTNTwJ8h07o/hqdefault.jpg
I Guarantee I Can Teach You to Master Photoshop. Learn How: https://phlearn.com/aaronwillteachyou
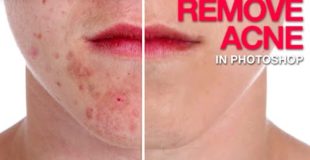
How to Remove Acne in Photoshop
Anyone who has gone through puberty knows that acne can stand out in a photo. Don’t let those spots get you down! In this episode we show you how to get rid of acne and pock marks in Photoshop.
The key to removing acne is to divide the process into two steps; The first step is to get rid of redness and the second step is to remove the blemishes.
How to Remove Redness
Half of the battle is removing the redness around acne and it can be difficult if you don’t use the right tools. In this episode we show you how to use Hue/Saturation to target specific areas of red and alter them so they look like normal skin tone.
Removing Acne Blemishes
After removing the color it is time to remove the blemishes. Adobe has done a great job with the spot healing brush in recent versions of Photoshop (CS6, CC, CC2014). It makes removing zits and blemishes very easy as long as you check a few settings. Be sure to select “content aware” and “sample all layers” so you can use this tool on a new layer and not destroy your original layer.
Simply paint over the blemishes to remove them. We suggest removing small spots first and then moving to the larger areas. To finish off the job, zoom out and paint larger areas. This will help to even out uneven skin tones.
Adding Red Back to Skin
In the first step we removed all the red from the skin. This is a necessary step when getting rid of acne but you will want to add a bit of red back to the skin to make it look more realistic. The difference is that the original red was blotchy and very saturated. This red will be softer and more subtle.
Choose the red color from the lips and paint over the subject’s face, then change the layer blend mode to Soft Light and reduce the opacity to 20%-50% or until the skin looks natural.
VISIT PHLEARN.COM FOR MORE FREE TUTORIALS
SUBSCRIBE TO OUR CHANNEL FOR MORE FREE TIPS AND TRICKS
http://www.youtube.com/subscription_center?add_user=phlearnllc
GET FREE TUTORIALS IN YOUR EMAIL + DISCOUNTS ON OUR PRO TUTORIALS!
https://phlearn.com/mail
BUY THE TABLET AARON USES! https://phlearn.com/tablet
LET’S BE FRIENDS!
Instagram ► https://www.instagram.com/phlearn/
Facebook ► https://facebook.com/phlearn
Twitter ► https://twitter.com/phlearn
Google+ ► https://plus.google.com/116791098059215639405
Phlearn ► https://phlearn.com
View Original Source Here
35 responses to “How to Remove Acne in Photoshop”
Can you did this in a video as well? Not just a picture?
How he change the colour of the lips ?
how about how to remove eye bags?
Very helpful tips sir
You may also try in android guys
https://youtu.be/J0HzfTnft9M
Good
Thank you! So much easier and better looking than painting all crazy on our subjects with the clone or just healing tool lol.
How can we grow artificial hair in photoshop
Yes but now that we have beauty mode in our every single phone this tutor seems useless now
What's the brush hardness set at?
Cool but it don’t work for black people
Thank you so much! Holy Crap! During my college graduation I had a HUGE zit on my chin and I was able to shop it out before posting the pics so I don't look like a monster!
How about for black spots, what do you do then
I am extremely grateful for your video about removing acne. I'm a freelance photographer and even though I've shot a lot of senior photos, I haven't come across someone with bad acne, until now. So, thank you very much. His mom is over the moon. I'm a fan.
How would you do this if the skin has a rash all over it? It makes it hard to use the heal tool.
Hi! How can I use actions one after the other. I have multiple actions some for different parts of each detail I want to tweak .. I Use an action for eye detail but then when I’m done I still want to use a different action for skin but I’ve run into the problem of it not showing up on the photo as I am using the brush tool. I follow the instructions to use White on a black layer mask at what ever opacity but it doesn’t show up . I’m not sure how I can do more than 1 action. I’m so confused please help
Very useful, subscribed.
Hello Aaron. I would really like to see at tutorial of how to fix a face full of acne. I have tried this and also Frequency separation (which I really like, so thank you for that video). But when it comes to a face full of acne, not just at bit like here, I have a problem with it starting to look too smooth. How do you go about it?
Hi! Thanks for a nice lesson! I would add, that we have to do smth.more, that is skin texture restoring. More layers and tools are needed. In case we are dealing with high quality work order. A good video!
how can you remove paint from someone's face in photoshop
Hello, I have a picture which is not original and has pale lines, can you tell me a free program that will help me to correct this photo? I want to make it professional Image. Or can I send you the Image? Text me you email please
Great stuff!
Definitely going to give this a try with my friend's shoot a lot more of simple tutorial than what I was seeing earlier on my YouTube feed thanks again for the video!
Fucking mastermind
You are cute, funny and seem very patient (just my feelings after watching bunch of your videos)
Your explanations take to long man
how to remove black spots?
Which command are you using along with the heal tool to remove the acne?
nice
Good work
Here's a challenge. Explain all that to an expert level audience in 1 minute.
#1.5 speed isn't fast enough
This was super helpful bro I appreciate you


At 4:00 you say "Ok we need to bring some color back in our lips" and then quickly do something with the adjustment layer and the brush tool turns into a circle and somehow you make the lips red again and the whole thing went right over my head. I have my PS work screen next to your video screen and I do not know how you did this. Please explain. Thanks.
but the real question is how to you retain skin texture. can can you use FS? and then hue saturation with a clipping mask or will the high frequency have the blochy reds in it as well?