[ad_1]
It happens to everyone, and usually only when it matters the most. You might be gearing up for a family Christmas video chat, settling in for a movie night on your big screen TV, or getting ready to record a tune that popped into your head and needs freeing. At some point, if you use a computer, sound is going to need to be routed.
How Linux audio works
Without going into technical detail, here’s a map of how Linux audio works.

First of all, there’s a source and there’s a target: something is making sound and something else is supposed to receive and process that sound.
For most everyday tasks, doing all this translates to using an application (like VLC Media Player, for instance) generating sound and a device (like your speakers or headphones) receiving that sound and delivering it to your ears.
The other way round is basically the same; a device (like a microphone) generates sound and sends it to an application (like Jitsi video chat or the Qtractor DAW) for processing.
No matter what, the model is always the same. Sound is generated by one thing and sent to another.
Between those two end points exists a Linux sound system, because, after all, something needs to route the sound.
Without going too far back in history, Advanced Linux Sound Architecture (ALSA) traditionally managed Linux audio. In fact, ALSA still manages Linux audio. The difference is that on modern Linux, users don’t generally need to deal directly with ALSA to route sound. Instead, they can use tools sitting on top of ALSA, like Pulse Audio.
If you have sound working on your Linux machine on a daily basis, but you get thrown off balance when you need to get specific about sound inputs and outputs, read on. This is not an article about how to install drivers or set sound defaults. If you want to know more about that level of sound configuration, visit support forums such as Linux Questions and documentation sites such as Slackermedia to help you. This article is about getting comfortable with the sound controls of a modern Linux system.
Why Pulse?
Why is Pulse necessary?
Strictly speaking, it isn’t. ALSA works so well that some distributions are just starting to integrate Pulse by default. However, dealing directly with ALSA can require a lot of manual hacking. I’m not talking about the initial setup. Using ALSA could result in some pretty convoluted configs and wrapper-scripts, and you still never get one configuration to serve your every use case. The problem wasn’t always with ALSA. Sometimes it was the fault of the application itself, but that doesn’t change the end result. Your box was still “broken” until you could swap out config files and restart the service.
The thing is, we’re demanding a lot more of our computers now than ever before. Audio output used to be either a speaker or headphones, but now we want our computer to beam audio across the room to the screen we use as a TV and to pick up audio from a Bluetooth mic in a phone.
Pulse sits patiently between the thing that is generating sound and the thing meant to receive that sound, making sure everything plays nicely with one another. It adds several bonus features, too, such as the ability to send audio to a different computer and invisibly changing the sample format or channel count.
Learning Pulse
To get comfortable with Pulse, you need to remember three things:
- Check your cables (virtual and physical)
- Set sound input or output from source of sound
- Manage your targets from Pulse Audio Control (
pavucontrol)
Step 1: Check cables and hardware
Check your cables. Check volume knobs. Check mute buttons and power buttons. You’re living in the “turn it off, and then on again” school of audio engineering.

Admit it. You’ve done this once or twice yourself, too.
If you left your headphones plugged in, or you forgot to power on your speakers, or turned the volume down on your speaker or the application playing sound, then spending time and effort configuring your system is pointless. Do the “dummy check” first.
Step 2: Check application preferences
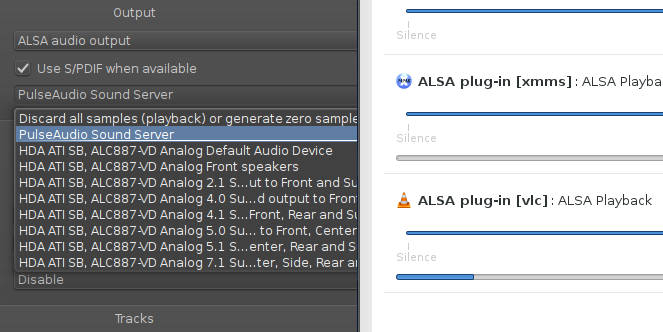
Similar to checking cables and knobs, check the settings of the sound application you’re using on your computer. Not all applications give you much of a choice, but there’s usually has some kind of menu somewhere governing what the application does with its sound. VLC, for example, gives you lots of choices:

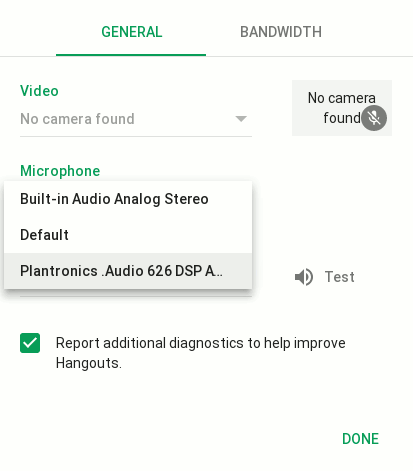
While an application like Google Hangouts gives you a simplified view:

The point is, you need to decide where your sound is headed once it leaves its parent application. Make sure it’s set sanely.
If you’re confused by all the choices, it’s usually safe to send sound to Pulse.
-
Send sound to Pulse to benefit from Pulse’s simplified worldview. You can send it to Pulse and manage it from Pulse’s control panel—Pulse’s job is to manage sound dynamically.
-
Send sound to ALSA if you want direct control. This may be important if you’re using pro apps, like a soft synth and an effects rack and a DAW, and you need absolute control over channel routing (with JACK or Patchage, for instance) and processing order.
Pulse has an ALSA plug-in, so even if your first choice as a destination is ALSA, you’ll still have some ability to manage that sound from Pulse. Pulse doesn’t “steal” your audio, so you don’t have to worry about Pulse intercepting your signal and re-routing it some place else. Pulse always respects the choices made at lower levels (and ALSA is about as low as you can get in the sound system, drivers notwithstanding).
Step 3: Pulse audio volume control (pavucontrol)
The nerve center of Pulse Audio is pavucontrol, more commonly known as “the sound control panel,” because its default home is in Gnome’s System Settings. (It’s also available as pavucontrol-qt for KDE System Settings.) It can be installed and invoked as a standalone application, too, so remember its official title.
You use pavucontrol on a daily basis to set sound levels and routing on your computer. It’s listed as step 3 in my list of things to do, but realistically it’s your first stop for normal, everyday sound management (in fact, when you adjust the volume on the Gnome desktop, you’re tapping into these same controls, so you use it daily whether you realise it or not).
pavucontrol is a dynamic panel consisting of five tabs:
-
Configuration: activates sound cards and defines the usage profile. On my desktop machine, for instance, I generally have HDMI de-activated and my built-in analog card on and set to Stereo Duplex. You won’t often use this panel; it’s mostly something you set once and forget about.
-
Input Devices: currently available input devices (anything capable of making sound). These usually consist of a microphone (very common on laptops, which usually have a built-in mic for the webcam), a line-in, and a “monitor” device for whatever is currently playing on your system (more on that later).
-
Output Devices: currently available output targets, such as desktop speakers and headphones (plugged into Line Out ports), and USB headsets.
-
Recording: currently active recording sessions. This might be a web browser looking for sound input for a video chat session, or it might be a recording application like Audacity. If it’s got a socket open for sound, it’s here.
-
Playback: currently active sounds streams being played. If it’s meant to be heard, then it’s here.
The important thing to remember about pavucontrol is that it is dynamic. If Audacity isn’t recording, then it won’t show up in the Recording tab. If XMMS isn’t playing, then it won’t show up in the Playback tab. If your USB headset isn’t plugged in, then it won’t show up in the Input or Output tabs.
Routing sound with pavucontrol
Routing sound in pavucontrol is done entirely through drop-down menus. First, try something simple by launching your favorite music player and and playing some music. Then open pavucontrol (remember, it may be located in the GNOME or KDE System Setting > Sound panel on your distro) and click the Configuration tab.
In the Configuration tab, take note of what device is the active one, and what profile it is using. Mine is Built-in Audio set to Analog Stereo Duplex, but yours may be different.
Once you’ve got that jotted down somewhere, change it to Off, and sure enough, the music stops. Well, it doesn’t actually stop, it’s just not being heard by you because you “un-set” your default active output. Change the setting from Off to whatever it was before, and your music returns.

As you can see, the Configuration tab sets the primary output for your system. For that reason, it’s the first panel you should check after installing a new graphics card; HDMI is infamous for trying to steal away priority from onboard sound cards. Otherwise, once it’s set, it stays basically unchanged until you install something new, or have the desire to add or change output devices.
Now for something more complex: let’s hijack the sound playing on your own computer and record it to a file.
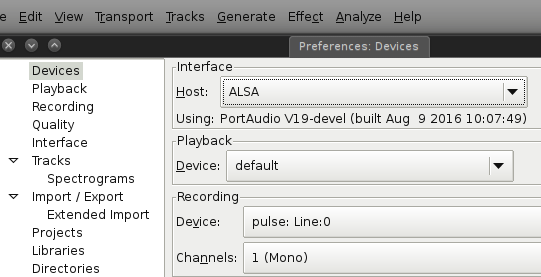
Launch Audacity and set its input source to Pulse.

Audacity > Edit > Preferences
Press the Record button or go to the Transport menu > Record.
At first, you should notice that you’re recording silence. Switch over to pavucontrol and navigate to the Recording tab.
In the Recording tab, click the drop-down menu on the right and change the sound source from Built-In Stereo (or whatever yours is set to, depending on your system defaults) to Monitor of. This sets the source of the sound from the physical device (in my case, the desktop speakers that I listen to music from) to a software monitor of that device. Check Audacity again and you’ll find that you’re intercepting and recording your own system.
Web input and other sounds problems
The same process holds true for video chatting with friends. If Pulse doesn’t know to send the input from your USB headset or your webcam mic to your web browser or video chat application, then unless it just happens to be the default anyway, the sound isn’t going to reach your video chat application.
The same is true for playing audio. If you’re playing a movie and not hearing the sound, check Pulse! It could be that you’re sending sound to a nonactive sound device or to something that’s been muted.
Linux plays sound!
There are always going to be sound issues with computers. Sound devices need drivers, operating systems need to detect them and manage them, and users need to understand how the controls work. The key to seamless sound on your computer is to setup the sound devices when you first install your OS, confirm it’s working, and then learn the tools the OS provides for you to control the sound settings.
Yes, it’s 2017 and Linux can play sound, but it can do more than that: it can manage sound. You can, too, as long as you learn the tools and, as always, don’t panic.
[ad_2]
Source link