[ad_1]
The trouble with video files is that they are not easily parseable. How can your computer tell whether that 8 GB file in your ~/Movies folder is the latest superhero movie, or your daughter’s soccer game?
I consider myself an early adopter of digital content. I prefer a digital format, and since I consume a lot of independent content that doesn’t have the budget for physical releases anyway, most of my purchases are digital files. I keep these on an NFS shared drive, and stream to Kodi or ncmpcpp, or whatever media client I happen to be using on any given Linux or Android device.
I tried devising my own naming scheme for my files, but not all media clients handled that very gracefully; they attempted to parse the names and determine the content type based on file names, or they ignored the names entirely, or even ignored the files.
I did a little bit of research, and discovered that for well over a decade, a sort of unofficial standard had emerged for exactly this problem. In typical open source fashion, there are dozens of applications available to scan a media library and generate external metadata files and assets, so that the media clients could better parse all the crazy things you throw at it.
The media client I’ve been using lately is tinyMediaManager.
Getting tinyMediaManager
tinyMediaManager is an open source media management tool that generates video file metadata for media players like Kodi (formerly XBMC), and other clients that use the same metadata schema. It is written in Java with Swing libraries, so it runs on Linux, BSD, Windows, Mac OS, and anything else that supports Java.
After downloading the tinyMediaManager archive (it will be a tar.gz file if you’re on Linux or BSD, and a zip file for all other platforms), unpack it to whatever path you prefer. I place my non-packaged applications in ~/bin, but it works just as well from /opt or /usr/local/bin; it’s up to your own management style.
As with any Java application, a hard requirement of tinyMediaManager is Java, or more specifically either JDK or OpenJDK. On Linux or BSD, install one of these from your software repository or ports tree; other operating systems should visit the Java site for downloads.
Once Java has been installed, you can optionally add tinyMediaManager.desktop to /usr/share/applications so that it shows up in your applications menu. You may also launch it directly from a terminal with the included tinyMediaManager.sh script (which is what I do, since I only use it occasionally):
$ ~/bin/tmm/tinyMediaManager.sh &
Getting started
When you first start tinyMediaManager, a setup wizard prompts you to provide it with a source that contains your video files, such as a local or network drive. Add your media location and then wait as tinyMediaManager scans the location.

It may seem obvious, but in order for a network drive to be added as a source, that network drive must be mounted on your current machine. You can’t just export the volume as NFS, or share it via Samba, and have it pop up in tinyMediaManager on another machine; the computer running tinyMediaManager must “see” the drive as a usable location. If you’re not seeing your media drive in tinyMediaManager, make sure you see it on your client machine first!
The setup wizard also gives you a choice of the metadata format you want to generate. If you don’t know, then it’s probably safe to use the default.
The big parse
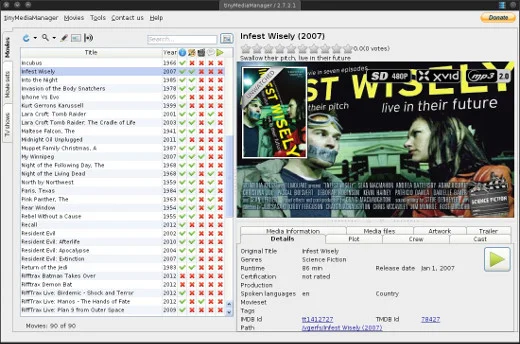
The reason you’re running tinyMediaManager is to get titles and movie poster thumbnails instead of generic icons, or an endless list of “Unknowns”, when you launch your media player. That means the next step is to identify all those video files on your drive.
To generate metadata, your media needn’t be in any specific layout, but the closer you get your files to easily-parsed entities, the better. It helps, for example, to separate TV shows from movies. It also helps to recognise when something is too independent to be identified; you’ll just have to sort through your obscure nerd indie collection yourself.
The very existence of digital media is, strangely, still a hotly debated topic, so there isn’t really an industry-standard schema for naming and sorting. Schemata have emerged, and in my experience Kodi’s preferred format is the leader.
Once tinyMediaManager lists the files it has found on your drive, click the magnifying lens icon in the top toolbar to start scraping the web for data.
Kodi expects to find one movie per directory, with the directory title and the movie file it contains in the format of ‘Movie Title (Year)’; for example, in a directory called ‘Infest Wisely (2007)’, I can place the movie file ‘Infest Wisely (2007).webm’, and half of tinyMediaManager’s work is done. From that information, tinyMediaManager can accurately identify the movie, and then pull in all the data the web has to offer about it.

When it is not provided with such explicit identification, tinyMediaManager makes every effort to parse whatever you do give it. It is pretty smart, and will propose titles that are close matches to your file names. Names like ‘infestWisely-jimMunroe-anarchistSciFi-xvid-SD.mp4’ might result in prompts for movies containing the words “infest” and “anarchist” and maybe a few others. Chances are good that one will be the right hit, and tinyMediaManager will let you choose which one to use.

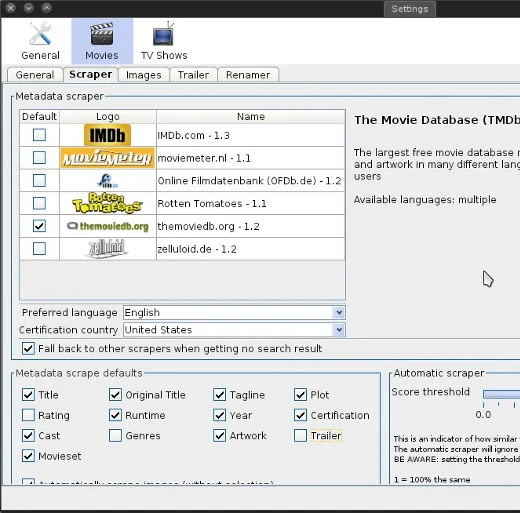
You can source metadata from a wide variety of websites, from the most obvious but not necessarily most reliable, such as IMDB.com, to lesser-known sites like themoviedb.org. For better results you can use more than one.

In the tinyMediaManager > Settings panel, you can even choose what metadata you want to pull from the web. For instance, I opt out from pulling data about genre, trailers, or ratings.
Manual override
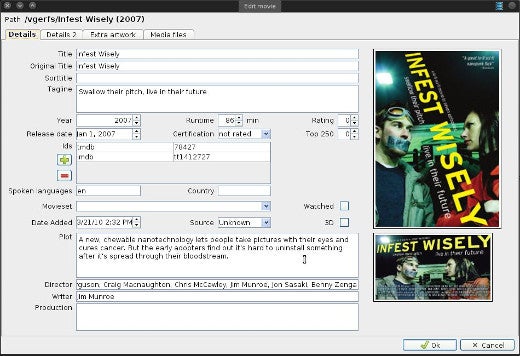
Some things cannot be identified; maybe you had to split a movie into two parts, or maybe you’ve done a fan re-edit of a film that you prefer to the original, or maybe you’ve made your own movie from scratch and the world has yet to discover it. In these cases, you can manually create your own metadata from within the tinyMediaManager interface.
Predictably, the Edit button is the pencil icon in the top toolbar. Select a movie to edit, and then click the Edit button to add or change information about any movie file.

All metadata about a movie or TV show is saved into the directory containing the media file. This preserves a natural association between a movie file and the data about that file, so there’s no messy database required. (Although tinyMediaManager maintains a database for its own features.) It is all on your file system, independent of any media client, and human and computer parseable.
Cut, and print
The point of tinyMediaManager isn’t necessarily to be a pedant about your movie collection. The end result of finally getting your movies and TV shows in order is that they look really nice when browsing your collection in your favorite media center.
There are, certainly, several other media management applications out there, including the terminal-centric Kolekto and MediaElch. tinyMediaManager balances nicely between providing the basic features, plus a few extras that make viewing your collection outside of Kodi (or your media center of choice) a pleasure.
[ad_2]
Source link