[ad_1]
Sleep is an essential part of human life, and parents quickly learn that lack of quality sleep (for themselves and their children) can lead to a whole host of other issues (behavioral, emotional, physical, etc.). But what does this have to do with Pi Day, or with open source?
As a concerned parent of two children, I want to make sure my children have a good environment in which to sleep—with the proper humidity, temperature, clothing, bedding, etc. Our children’s bedrooms are on the north side of the house, which gets precious little sunlight during the day, and on top of that, both bedrooms are far away from the central heating ducts, meaning warm air isn’t quite as warm when it reaches their rooms. This bothers me because, the National Institutes of Health tells us that there is a greater risk for SIDS and other health problems in cold weather:
“Parents and caregivers should dress infants in light clothing for sleep and keep rooms at a temperature comfortable for adults. […] Infants are sensitive to extremes in temperature and cannot regulate their body temperatures well.”
We could feel it ourselves—the front bedroom was a bit colder than the rest of the house. But how much colder? And how much time did their rooms spend at lower temperatures that might negatively impact our children’s sleep? And finally, what fun things can I do with the Raspberry Pis accumulating on my desk?!
Putting on my developer hat, I decided to build a Raspberry Pi-based temperature monitoring network in the house, get some hard data on temperature trends in different places, then use that data to find whether the solutions we tried helped. Science!
Raspberry Pi temperature monitoring network
The first step was to build a Raspberry Pi temperature monitoring application that could be used to aggregate data from remote sensors (whether Raspberry Pi or something else entirely, like an Arduino, which I initially experimented with).
Many people recommend the DS18B20 1-Wire thermometers for accurate and inexpensive temperature measurement, so I bought a bundle of these sensors, and tested them on a Raspberry Pi (via GPIO) and an Arduino UNO (via digital PWM pins). I bought both waterproof sensors (like this one) and transistor-sized sensors (like this one), and found the waterproof sensors were slightly more accurate and easier to position and calibrate.
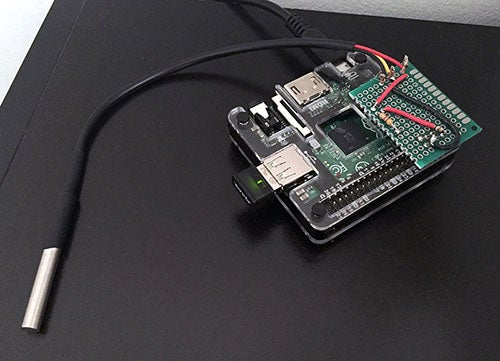
These sensors are fully supported by the built-in w1-gpio library, which allows easy readouts of 1-Wire devices via /sys/bus/w1/devices. I wired up the DS18B20s to a few Raspberry Pi A+s, and placed them in all the main parts of the house. Then I also integrated data from my Nest Thermostat API, and local outdoor temperature data from Weather Underground, so I could correlate temperatures more precisely with the surrounding environment. Here’s a picture of one of the Raspberry Pis on a bookshelf in one of the kids’ rooms:

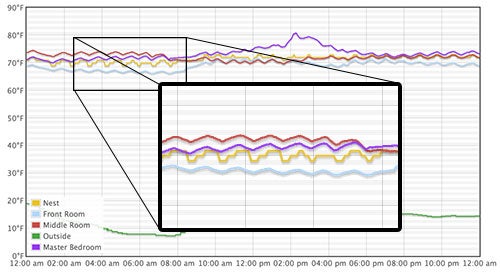
After building a quick alpha version of the monitoring app (using Node.js and Express to build a very simple API and dashboard page), I put all my code and instructions up on GitHub in my temperature-monitor repository. For a few weeks, I monitored the temperatures on a rolling 24-hour graph, and noticed the same trend on every cold night:

The front bedroom would consistently drop to near 65°F through most of the night, while the rest of the house remained closer to the temperatures reported by our Nest thermostat.
We tried many different things to improve the situation, but they were all fruitless:
- At night, we closed off some of the heater vents in the main rooms of the house, far from our bedrooms. This helped a tiny bit, but was annoying and not a very good long-term solution.
- We tried limiting cold air entry through the (slightly drafty) windows with thicker curtains, but it was also a very slight improvement (our house has a brick veneer, so the cold brick north-facing wall makes the entire front wall a bit chilly).
- Running the HVAC fan continuously through the night, to try to even out the temperature difference between the cold room and the other warm rooms. This didn’t help as much as I’d hoped either.
We considered placing an infrared space heater in the child’s room, since we knew that would solve the problem, but after testing two different models with all the safety features we could find in our own room, we were very concerned about putting something that produced so much heat on the ground level of a kid’s room.
We finally found out about a neat, unobtrusive wall-mounted space heater (more of a slab of stone with hot wires running through it), and decided to buy one, mount it in the room with a thermostat-triggered outlet (so the heater only comes on at certain temperatures), and measure the results. After the first time we turned on the heater, it looked like it was doing a decent job of warming the room without getting too hot (as measured by a Seek thermal imager, shown below), and we mounted it above a dresser high enough on the wall so our child couldn’t reach it:

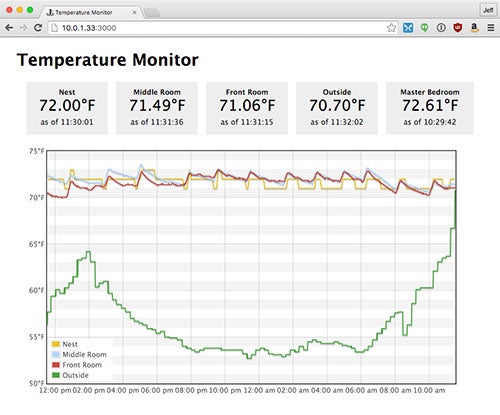
After a couple night’s monitoring data, we were pleased to see the wall heater increased the temperature of the front bedroom to something much more in line with the other bedrooms in the house:

To save money, we also set the thermostat-triggered outlet to run only at night time, and only if the temperature in the room dropped below 70°F.
Only the beginning of what’s possible
So many Raspberry Pi owners I know have one (or many) sitting in a drawer somewhere collecting dust—you might be one of these people! I hope something you read about this week on Opensource.com, or elsewhere in celebration of Pi Day, inspires you to grab that Raspberry Pi and do something fun, useful, or even maybe sleep-improving with it!
I’m planning on building out the network a little more, and also adding in some things like remote-controlled HVAC branch controllers (using Arduinos and some slight modifications to the branch air ducts), so I can have the monitoring app automatically ‘turn down’ the airflow to parts of the house at nighttime or during parts of the day where nobody’s in the bedrooms, for slightly more efficiency.
What awesome projects will you start working on with a Raspberry Pi—or ten of them?
[ad_2]
Source link