[ad_1]
Let’s a few minutes to talk—well, read and write—about one of my favorite parts of the creative process: concept development. You can call it brainstorming, spit-balling, daydreaming, pre-production, or even imagining. (Just don’t call it “ideation,” please. That word hurts my soul.) It doesn’t matter if your project is a painting, a feature film, or a software tool that someone else will use to paint or make a movie. They’re all creative processes and they all start with an idea, a concept.
Getting that concept out of the nebulous corners of your mind and into any kind of tangible medium can certainly be a challenge. However, the process can also be incredibly fun and rewarding, perhaps even a bit cathartic, depending on the subject matter. So you’re an open source creative, how do you get those ideas out? What tools do you use? What going to be the fastest way to get the bones of your idea formed? From there, you can refine it, share it with others for feedback, and ultimately flesh it out in a finished work. But the skeleton, that’s first.
I’m not going to prescribe a set of steps or tools that dictate “how concept development is done.” That wouldn’t be accurate or helpful. I don’t think I’ve ever spoken with two artists who have the same approach. Everyone does it differently. However, everyone also borrows techniques from others when they think they’ll fit. To that end, I’m going to share with you my process. Maybe there’s a nugget of something in there that you’ll find useful. Even better, perhaps you’ll share your process in the comments and I can learn from you.
“Ideapaper”
Ideapaper is my personal term for any scrap of paper, back of an envelope, or restaurant napkin that’s available for me to scribble an idea upon with my pen (which I always have on my person). Of course, I have a sketchbook that serves as a more formal repository for mad musings, but that’s much more difficult to have at the ready at all times.
Good ol’ pen and paper does seem to be an odd place to start for the highly technically-minded crowd that frequents this site, but for me, those tools are my preferred launch pad. Perhaps it’s just old-school sentimentality, but there’s something about the tactile act of physically scraping pigment across pressed wood pulp. It activates a number of the creative parts of your brain in ways that tapping on a keyboard or screen simply don’t.
For me, I use pen and paper for the start of almost everything: concept sketches, written descriptions, functionality diagrams—I even use it to plan timing, budgets, and thoughts on folks I might be able to cajole into helping. It’s a very fast process that helps separate potentially good decisions on where to take a project from completely worthless ones. It’s also incredibly cheap and the battery life on pen and paper is phenomenal.
The strangest thing is that, for me at least, those scratches on paper could be completely incoherent at the end. In six months, a week, or even an hour later, I might not be able to decipher any of those markings on my ideapaper. However, taking even that little bit of physical action, I’ve moved the process forward and my idea is that much closer to being real. I don’t have to remember those marks. The concept has already begun to solidify in my mind.
Mind maps
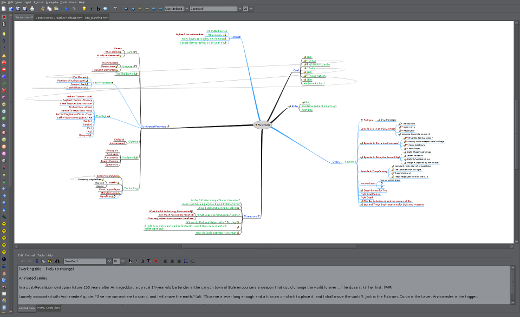
This is a step that could also be done reasonably well on ideapaper, but I prefer to use a digital tool. Mind mapping is a visual diagramming technique that’s frequently used in brainstorming sessions, but it can also be used as an organizational tool once a project is underway. In it’s most basic form, you start with the kernel of your idea as a central blob, or node, and thoughts related to that idea branch off of it in a roughly hierarchical structure.
For this, my weapon of choice is Freemind. The interface may feel a bit dated (what’s up, 1990’s Java widgets!), but it’s incredibly powerful. Even among proprietary tools, there aren’t many that are as fully-featured as Freemind. In fact, the Freemind file format (.mm) is pretty much the defacto standard when it comes to exchanging mind maps between applications.

I use mind maps for everything from designing story worlds to planning podcast episodes. With Freemind, not only do you get the hierarchical spider map structure inherent to mind maps, but it’s also an HTML native. You can link nodes on your mind map to mood board images, reference websites, or even your own sketches and documents as you work. If your creative project is content for a website, a Freemind mind map is a visual version of your sitemap. I’ve even seen conference talks where Freemind was used as the presentation tool instead of the more conventional options (admittedly, it’s been a while since I’ve seen one of those).
And because a mind map in this form is digital, it’s easily shareable. While the freeform nature of mind maps can look a little chaotic, there’s still some organizational structure and the visual nature of a mind map does make it easier to decipher. Of course, if the people I’m sharing with aren’t partial to mind maps, I can cater to them as well with the wide assortment of export options in Freemind. Mind maps can be exported to anything from static images to HTML pages or even Open Document ODT files that can be opened in LibreOffice.
Concept sketches
Sketching is also something that’s doable on ideapaper, but meatspace sketches are harder to share online (if only a little bit), they don’t have fun digital features like layers and undo, and they can’t be directly linked from a mind map. So if I have a concept that’s progressed from ideapaper to mindmap and it requires sketches (for character designs, layout ideas, storyboards, and so on), then I prefer to make those sketches digitally.
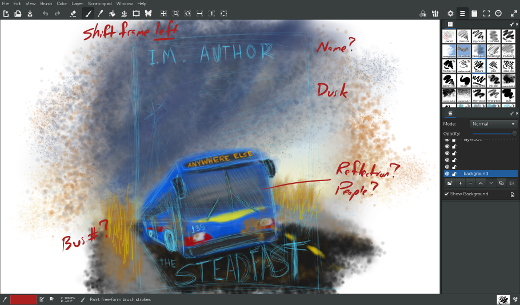
For that, my go-to tool is MyPaint. Other people may choose to use programs like Krita or even GIMP. Those tools certainly have more features than MyPaint does and they’re great for finishing projects. However, they don’t load as fast and in my opinion neither has the same level of drawing freedom. If I have an idea that needs scribbles, I fire up MyPaint. It launches almost instantly and then it gets out of my way and lets me get to drawing and painting on its scalable, rotatable, boundless canvas. I don’t have to worry about document sizes or color spaces. I just get in and get that idea down as quickly as possible.

MyPaint’s brush engine is no slouch, either. Drawing in MyPaint feels quite a bit like drawing in my sketchbook. It’s very responsive and does a good job of matching the aesthetic of traditional media. And I can easily keep pencil sketches on one layer and put additional refinements on other layers using brushes with cleaner lines and better-modeled color.
Another thing worth noting is that MyPaint natively uses the OpenRaster (.ora) format, an open source raster image format that’s pretty widely supported. So when your project moves from concept to production, it’s no problem to take your MyPaint sketches and open them in Krita or GIMP for more nuanced modification.
Pencil tests and animatics
My background is in animation, so quite often the concept work that I do revolves around that particular medium. If you’ve never been involved with animation, let me tell you that it’s a long and involved process when you get to production. Changes and revisions are time-consuming and expensive. Because of that, the pre-production process for animation is vitally important. You want to get as many mistakes and bad decisions out the way as early as possible. Two very useful tools in animation pre-production are animatics (an animation’s storyboard turned into a video) and pencil tests (quickly-drawn animations for feeling out poses and timing). Even if you’re working in 3D animation and not hand-drawn animation, animatics and pencil tests are immensely useful for separating story or design choices that might work from the ones that definitely don’t.
On the animatic side of things, you can typically get away with a simple video editing tool. Programs like OpenShot or Kdenlive are perfectly fine tools for handling this task. However, these programs are primarily geared for handling video and they’re not necessarily the most comfortable tools for working with the sequences of still images that are more common in animatics. So, knowing me, it’s no surprise that the built-in Video Sequence Editor (VSE) in Blender is where I go to cobble together my animatics. It’s not just that I’m comfortable with Blender (though that certainly helps), but Blender’s VSE is a very capable video editor. It’s especially adept at handling a series of still images and giving them the arbitrary timing adjustments necessary in an animatic. And, like MyPaint, Blender launches super fast and lets me get to work right away.

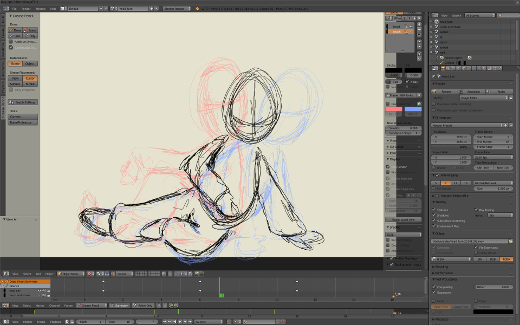
For pencil tests, I used to use Pencil (now Pencil2D), but it was never particularly stable for me and development slowed down quite a bit. It’s picked up a little in the recent year, but I haven’t had a chance to take a renewed look at it. I’m extremely excited for the animation features that have been added to the upcoming 3.0 release of Krita, but I’m not ready to use that on a live project just yet. And while I’m really interested in seeing where the development of the recently-released OpenToonz, it’s still pretty early on and it doesn’t yet run on my operating system of choice. Where does that leave me? Well, you guessed it. Blender!
Blender’s Grease Pencil feature is a remarkable tool that lets you draw lines right in the 3D View. The original intent of this tool was for annotation and giving collaborative notes on a peer’s (or subordinate’s) 3D animation. You can sketch in the 3D View to quickly show an animator or modeler what a character’s silhouette should look like. However, Grease Pencil has grown to be so much more. Not only can Grease Pencil curves be edited, they can also be keyframed. This means that regardless of whether the finished animation is supposed to be in 2D or 3D, I can sketch a series of poses in Grease Pencil and test their timing right from within Blender. Then I can either use that as a direct reference when animating in 3D or I can render my Grease Pencil tests to short reference animations that I can use in 2D animation tools (like Krita, OpenToonz, or even Synfig.)
On to production!
So there you have it. Those are three of my primary steps in concept development and the tools that I use in each one. Of course, depending on the specifics of the project, there could be other tools. For instance, in software development, you might use Python to quickly rough out a proof of concept on a tool that will ultimately be written in C or C++. For collaborative story development—say, for a script or a video game—you might use Etherpad for writing on the same document with your team. You might choose to use Alchemy for a truly free-form concept-drawing experience. There’s a fairly wide array of options.
In fact, just as I mentioned at the start of this article, I know we all approach concept work differently. What’s your process? What tools do you like to work with? Share them in the comments. I know I’m totally game for trying out new techniques and tools… and I’m sure there are a lot of other people in this community who are, too.
[ad_2]
Source link