[ad_1]
Earlier this year, I wrote an article about how to use the Raspberry Pi to create a music light show using an open source project called LightShowPi. My little Christmas tree light show was popular enough that I was invited to demo it for a group of middle school kids in North Carolina.
Which brings me to this year’s Christmas season. I was flirting with the idea of taking the light show outdoors, but due to the business of life I just ended up not having enough time (or motivation) to make that leap. I did, however, put a bit of time into improving last year’s setup.
Instead of five channels running 500 lights, I have eight channels running 800 lights. I also modified the LightShowPi’s configuration to customize the lights a bit more. I am running all songs in four channels and mirroring the other four channels. This makes the lights a little more fun with fewer blackouts from unused channels during certain songs.
My configuration is now headless as well (i.e., no monitor), and is running on a Raspberry Pi 2. The headless configuration is nice, as I don’t need room under the tree for a monitor anymore. The Raspberry Pi 2 (instead of the B+) doesn’t make much of a difference, as the performance of LightShowPi is great in either version. With the WiFi dongle, I just SSH into the Pi from my phone and start/stop the lights and music anytime I want.
Finally, this year I also put a bit more thought into the the song selection, trying to add a bit more variety and fun songs to the playlist.

Here’s a sample of what the tree is looking like this year:
After getting the Christmas tree lights up and “dancing,” one problem immediately became apparent: My wife and kids wanted a simple way to toggle between “solid” and “dancing” mode.
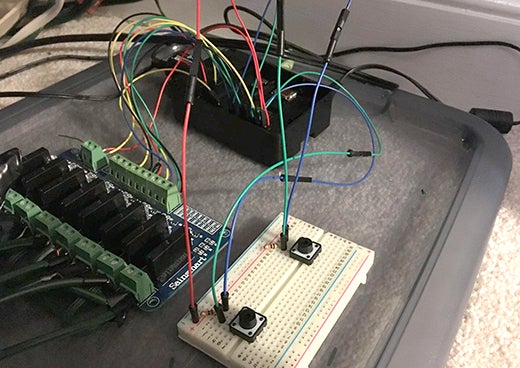
So, I went through my Raspberry Pi CanaKit and decided to try to use the push buttons that came with it to solve this interesting problem.
To help me set up the buttons, I used this nice video tutorial. Here’s the result.

Then I had to write up some code to make this work. At first I based my code on the YouTube video I linked to above, but I didn’t like that it had so many loops. So, I did some more reading and was able to come up with a better piece of code. Granted, I’m sure the code can be improved a lot, but it’s good enough for a small personal project/proof of concept.
#!/usr/bin/env python

import RPi.GPIO as gpio
import os
import time

gpio.setmode(gpio.BCM)
gpio.setup(4, gpio.IN, pull_up_down=gpio.PUD_UP)
gpio.setup(17, gpio.IN, pull_up_down=gpio.PUD_UP)
lights = 0

while True:
    b1 = gpio.input(4)
    b2 = gpio.input(17)
    #button 1 (solid lights)
    if (b1 == False):
       if lights == 0:
           os.system("export SYNCHRONIZED_LIGHTS_HOME=/home/pi/lightshowpi; sudo python /home/pi/lightshowpi/py/hardware_controller.py --state=on")
           lights = 1
       elif lights == 1:
           os.system("export SYNCHRONIZED_LIGHTS_HOME=/home/pi/lightshowpi; sudo python /home/pi/lightshowpi/py/hardware_controller.py --state=off")
           lights = 0

    #button 2 (dancing mode)
    if (b2 == False):
       if lights == 0:
           os.system("export SYNCHRONIZED_LIGHTS_HOME=/home/pi/lightshowpi; sudo lightshowpi/bin/start_music_and_lights")
           lights = 1
       elif lights == 1:
           os.system("export SYNCHRONIZED_LIGHTS_HOME=/home/pi/lightshowpi; sudo lightshowpi/bin/stop_music_and_lights")
           lights = 0

    # trying not to waste cycles on the pi
    time.sleep(0.2)
The code above basically uses the python RPi python library to interact with the two GPIO pins I use for my buttons (pins 4 and 17), and if a button is pressed and the lights are already off, then turn it on, and vice versa.
Finally—and this took me a while to figure out—I had to modify the $SYNCHRONIZED_LIGHTS_HOME/bin/stop_music_and_lights script that comes with LightShowPi because it had a sudo killall python on it that would kill my Python script.
So, I modified that line to:
sudo kill $(ps aux | grep 'synchronized_lights.py' | awk 'print $2')
That’s it! Here’s a look at the end result:
[ad_2]
Source link