https://i.ytimg.com/vi/ym6IL0gUR6I/hqdefault.jpg
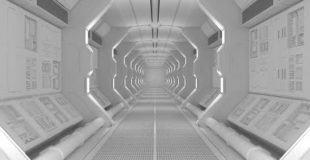
Discover how to create a sci-fi spaceship corridor using Blender.
Visit the tutorial page: http://www.blenderguru.com/videos/create-a-spaceship-corridor-part-1-of-2
source

https://i.ytimg.com/vi/ym6IL0gUR6I/hqdefault.jpg
Discover how to create a sci-fi spaceship corridor using Blender.
Visit the tutorial page: http://www.blenderguru.com/videos/create-a-spaceship-corridor-part-1-of-2
source
32 responses to “Blender Tutorial: Create a Spaceship Corridor in Blender – Part 1 of 2”
The new displacement modifier (using experimental mode on CPU / GPU) could do all the heavy lifting for that side panel with lots of detail. Just find a picture online that looks something like what you want, convert to black and white, UV unwrap correctly and bam, you can add the image to displacement which will extrude the mesh automatically where you need it, just have to make sure you have enough subdivisions for it 🙂
wish we'd get a nice tutorial for noobs, like cars or guns or clothing, we're not all here for scenes lol but appreciate all the tutorials
Thank you for the effort
21:24 OMG XD
oK….I've done this tutorial about 7 times now. To keep up I just slowed it down to .5 speed and you sound SO DRUNK! lol
About the curving of the walls: Space doesn't have gravity. So there is no force pulling things "down", thus "structual integrity" is not applicable. What does however exist is a difference in pressure between the inside (~ 1 athmosphere for humans) and the vacuum of space. For that rounded shapes are best, because they distribute the force evenly along the surface which causes less stress on the material. The same is true for high pressure gas tanks or deep see subs.
really great tutorial.
Did you design the new crystal maze set because this image and the new set look very similar
Great tutorial.Most informative for someone wanting to learn workflow from modelling through to texturing. I myself am stuck at (42: 42) , when i copy a section to re-use it it is mirroring the selection.?? anyone ??
5:35 help! all of my settings for the mirror are the same as his yet there is a gap between the 2 pieces.
the only way that i can do to study on your vidio is make video speed 0.5. Nice one
Lovely, but u are so fast in teaching, I can't even get the keys you click on
what is the difference between "intrude" and "extrude" in blender? in a beginnen tutorial you did use intrude to make a mug but could i use "extruding -> size" for the same effect?
So cool!
I know you guys are not IDIOTS!!! 24:45
why timelaps :(((( i was thinking you are the first guy how really talk over all now im really sad
This maybe from 2012 but I can tell you something this is still AMAZING to look at and learn from on 2017!
to texture this shit will be the hardest part I think…..poor Andrew 😉
Is this techniques still worth following in new updated versions?
after i scaled the floor and ceiling with the walls to make it even it created gaps between the meshes is there a way to fix this? i noticed like way later so im not sure i can undo back to it…
Uhm. Good tutorial! Why did I not find it earlier? I mean… it's from 2012 😀 So I just sat 8 Hours to come here. oh god 😀 Tomorrow I'll start with applying materials xD
35:45 Eye orgasm
This is really good and very useful tutorial. Its applicable to modeling artists who intend to work in spaceship or Aircraft industries. And applicable to film industries too!
First thoughts: OMG… THIS IS A REALLY LONG TUTORIAL…
I will edit this comment when I finish the tutorial. 🙂 By the way, I know this is a really old tutorial, but you should use the snap tool more often, as it's really useful when it comes to combing objects that have an array modifier.
"I'm not sure why they use like half a keyboard in the future, but they are, so… " – Andrew, July 26, 2012(26 July, 2012)
If I was to guess, One switch is an Alt-gr, and one is a Function Key…
If anyone ever needs to know, the a Keyboard is measured in "Keycap Units." One Keycap Unit is equal to 19mm — most keycaps tend to be smaller though, but they are spaced out 19mm from centre to cetre, leaving gaps between the keys…
19mm is about .748", if you actually uses inches is modeling things other than Houses, and Furnature, of course…
I think this is amazing, but far too advanced for me when it comes to blender. I really need to work on the basics first. Like where all the buttons are. hahaha.
would it not be hard to map that out into uv, for exporting into game engine?
Yep, "Use every part of the Buffalo".
Hmm, when I extrude the rectangle it doesn't do so to the same degree on the sides and top/bottom. How can I make this even?
1:03:00
49:52