https://i.ytimg.com/vi/jRy1t25ghig/hqdefault.jpg
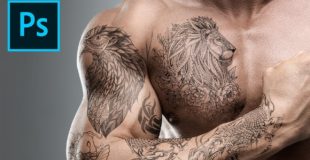
6 Simple Steps to Adding Black Realistic Tattoos with Photoshop! Learn how to use advanced layer properties and filters to apply tattoos to the skin naturally.
In this tutorial, we will mostly take advantage of the liquify filter to shape the tattoo according to the surface of the skin and then use “Blend If” to blend the tattoo and add highlights to it.
I hope this tutorial helps you. Thank you so much for watching 🙂
► DOWNLOADS:
1. Sample Images: http://bit.ly/35Vnrlo
2. Finished PSD: http://bit.ly/2BqK7f3 (Only for our Patreon Family)
► HELP US CREATE MORE FREE VIDEOS:
Support us at Patreon: https://www.patreon.com/piximperfect
► SHARE: https://goo.gl/IUhnUl
►LET’S CONNECT:
Facebook: http://facebook.com/piximperfect
Twitter: https://twitter.com/piximperfect
Instagram: https://www.instagram.com/piximperfect
View Original Source Here
43 responses to “Add Amazing Tattoos Under 3 Minutes with Photoshop!”
Plz explain Tiff vs PSD
NO ONE IS GREATER THEN YOU BROTHER IN INDIA.
I wonder why you don't use a displacement mask? Can you please show this same tutorial with the use of a displacement mask, please?
I've bene waiting for a tattoo tutorial from you for a long time. Thank you,sir. 🙂
Hey,Can You Please Make A video on what does that histogram in curves indicate and how to use it?
Hello sir, I saw your videos on YouTube, I like it. And thank you so much for shooting this beautiful tutorial.
Sir, I'm speaking from Bangladesh. My name is shakil I want to do A, Clipping Path & Background Removing in Fever, but I can't figure out how to create a clipping path, background removal, gig image. So if you were making a video on this topic it would be great.
Thank you very much! I was looking at tutorials for the last couple of weeks for my photography project and couldn't find anything suitable. Love your channel you're great!
Awesome!!!!!!!!
lots of people around the world wants to follow you but Youtube and facebook are filtered, like Iran. please put your amazing tutorial clips on Telegram app too. thank you
Nice tip
Super bro…do more videos foe we
I always suggest my colleague to refer to your video as reference to photoshop. By far 100% problem solved
I love how fast and clear this was.
👏👏
Thanks for teaching
Getting a tatoo is painful, so just photoshop it.
Why don't just use bump map?
we love short videos bro
Bro…… A Tutorial On Digital Painting
Thank you so much
Very nice
love the new format of your videos 👍
Really Amazing
Superb
Love your tutorial…. I want sell something in my instagram, but i confuse how to edit my photo product. Would you make video about tips and trick how to make product looks good?
Very precise and short. That's great.
Another great tutorial 👏🏼👏🏼👏🏼👏🏼
Bruh what 2 MINUTES???
Sweet! Thank you 🙏🏼
Thanks for this tutorial Unmesh, Have a nice weekend dude
This is about the only way I would get a tattoo, something that's temporary, removable and interchangeable. Pretty sure I'd get bored and tired of a real one. Much easier than the previous Photoshop technique.
Please teach us how to make a mosaic portrait!!!
Best tutorials always 🧡🧡🧡
would a displacement map be better
Could you use a displacement map instead of liquify to shape the tattoo ot fit the body?
Thanks for teaching us a simple way of doing this now I can scare my mum
Wow!
Unmesh, You are simply superb man. Viewing your lessons is in no way different from listening to a soothing music or enjoying a movie or sporting a video game!!! I love your lessons.
🙌🏻⚡️💪🏻💥👏🏻 and I never knew about the liquify + show background option!
Nice
Can you translate videos into arabic, please
do a haircut edit next! thanks!
I do wonder if you realise how many of us you've inspired, thank you Unmesh, you are the best.