https://i.ytimg.com/vi/Hl7lsx_8jxc/hqdefault.jpg
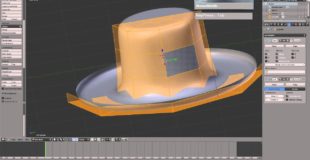
This is my 1st Blender tutorial for 2012, I apologize to all my faithful subscribers for waiting so long. Let’s just say I got sidetracked with work at Lucasfilm and of course my Multicopters collection. Thank you for your patience, I will be developing new modeling tutorials to help beginners learn this fantastic 3D application.
source
18 responses to “Blender Modeling Tutorial – Homburg Hat or “The GodFather Hat””
Awesome. Glad you showed the CNTRL+click to auto-center. Because in Blender 2.79b it has nothing in the Knife Topology that is changeable.
video starts at 3:35
watch at 1.25 speed
nice thanks
tutorial could of been about 20 minutes shorter but this is great for absolute beginners and i learned a few new things myself. all around good job
Very good tutorial. Learned a lot. Thanks.
thanks
Great tutorial, by far the best I've seen! Thanks a lot!
Also, can you please do a tutorial on how to UV map this hat! thanks!
How do I connect all the commponents (the hat, the ribbon and the ben) into one? help would be most appreciated
Nice tutorial, it helped me a lot!
How do you upload it to workshop
Check your axis orientation and try to follow the same orientation when I start the tutorial. The axis I mirrored is the X axis. Also you have to move the halves to until they touch for the clipping to work. Move one half until the edges touch and then move it back to the original location.
My hat's fat. :C
Hmm, that could be achieved by UV mapping both sides on the same texture plane. You might want to google "projection painting on Blender" to see more examples.
Thanks! The subdivision modifier will only add the sudivided faces once you hit "apply" in object mode on the modifier button. When working on the model, 3 levels of subdivision is sufficient for most feedback, anything more will slow down your interaction and crash your system if you hardware can't handle the extra geometry.
One more question. Is there a mirror function that allows me to texture my object on both sides at the same time. I saw an unfinished tutorial with someone painting on both sides of a model. They also had more brush functions then the ones in 2.63 some looked like sculpt brushes.
Great tutorial. Only a few questions about all the other functions in the mesh menu when your in edit mode. I wondered if the subsurface function adds more geometry to the mesh. I am sure the subdivide function does because if I go up to five levels it crashes Blender. Being new to blender I stick to what I know and Blender has many modelling commands I have not used yet.
Awesome! Keep up the good job.