https://i.ytimg.com/vi/YRgcXnd1Wl4/hqdefault.jpg
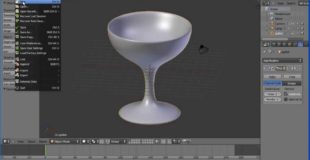
This tutorial shows how to make a 3D mesh model of a goblet using the Spin tool, a lathe operation similar to a real world lathe tool.
Key points
How to start a mesh model from scratch by deleting all the vertices of the default cube.
How to add, move and delete vertices to make a profile of a goblet.
How to spin the profile about an axis to create a 3D model (removing doubles).
How to close holes in the model.
How to apply the Subdivision Surface modifier.
How to use Smooth shading and correcting any banding caused but not correctly calculating face normals.
In detail –
Go into edit mode and delete all the vertices of a cube.
Add new vertices by holding down Ctrl and pressing the left mouse button.
In Front view draw the profile of a goblet by adding vertices.
Edit the profile by moving, deleting (merging) and adding vertices (Subdivide).
Go into top view and make sure the 3D insertion cursor is center (Mesh menu – Snap, Cursor to Center).
Click spin, change the Degrees to 360, change the number of steps to 24.
The profile is duplicated 24 times the last time on top of the first, select all and remove doubles.
Filling holes by selecting a ring of edges, extruding a new ring and scaling it with value of zero (remove doubles)
Apply the Subdivision Surface modifier setting the level of subdivision to two.
Apply Smooth shading to remove any banding go into Edit mode and select all, in the Mesh menu select Normals and Recalculate Outside.
For files and resources go to my website –
http:blender.freemovies.co.uk
source
34 responses to “Blender Tutorial Making a Model of a Goblet/Wine Glass Using the Spin Tool (Lathe Operation)”
This seems rather clunky though, there's no need to have/edit a cube, also closing the model in that manner appears to leave a multitude of superfluous facets and vertices within the stem of the goblet.
Mines does not have modifiers where can I find object modifiers?
It doesn't work for me. Sorry for my thumb down.
Where do you set that rotation is around 3D cursor, please?
exelente
Thank you, this is what I was looking for.
Clear and specific tutorial!
a made a bowl hahahhaha
First Blender tutorial under an hour I've come across… thank you for that as well.
Very good tutorial. Only thing I didn't get is how to select the entire ring of edges. When I hold "O" on my keyboard and right click, nothing happens.
instructions unclear, control left click adds cubes to scene O.o
thank you
how select all to spin (this is real good tuturial )
Thanks!
Thats how Tutorials should be.
You ROCK!! short, straight to the point, exactly what I needed. Thank you very much!!
Nice quick tutorial, just the way I like it.
At 1:30 right before you push the points around, you forgot to tell us how you're able to do that!!?
Very nice work clear and concise got me up and running with creating a jar in a couple of minutes.
still don't get it
Thanks for the tip about control-clicking to add the points. I was fighting with the unbelievably rubbish Bezier curve tool trying to get it to behave, then not being able to spin it at all. Bezier curves in Blender are HOPELESS!
Great; I Was Looking For A Simple Way To Lathe An Object. Thanks For The Tutorial.
pressing ctrl + left mouse click don't add vertices!!!
I have a question. After you delete the cube, how do you add a vertex?
Great tutorial!
im using a mac btw
i cant add vertices
Sorry in Britain we call the letter 'Z' – zed, hold down the Ctrl key and press 'Z'
i need help wats ctrl zed?
Hi Ian…Very clear imparting/tutoring. A problem I'm newly encountering, having used the spin tool quite a few times over recent weeks, is that the parameters of the spin operation usually appear (on L clicking "SPIN") but no longer appear and I'm stuck with a default 90 deg./9 segment spun object and can't alter those parameters. Any ideas on how to retrieve these? Spin becomes useless with this restriction as I was looking fwd to using it to recreate cast iron mouldings and multi arc geometry
Quite often.
do you upload blender often?
No plans to do a hair tutorial in the near future sorry.
Great clear tutorials. Thank you also for telling us how to add and "delete" vertices.