[ad_1]
The Raspberry Pi camera module is a great accessory for the Pi—it’s great quality, and can capture still photos and record video in full HD (1080p). The original 5-megapixel camera module was released in 2013, and a new 8-megapixel version was released in April this year. Both versions are compatible with all Raspberry Pi models. There are also two variations—a regular visible light camera, and an infra-red camera—both available for US$ 25.
The camera module is high spec and much better quality than a basic USB webcam. Its feature-packed firmware fully utilizes the power of the VideoCore GPU in the Raspberry Pi SoC, allowing recording 1080p video at 30fps, 720p at 60fps, and VGA resolution (640×480) at 90fps—perfect for slow-motion playback.
Get started
First, with the Pi switched off, you’ll need to connect the camera module to the Raspberry Pi’s camera port, then start up the Pi and ensure the software is enabled. Locate the camera port on your Raspberry Pi and connect the camera:
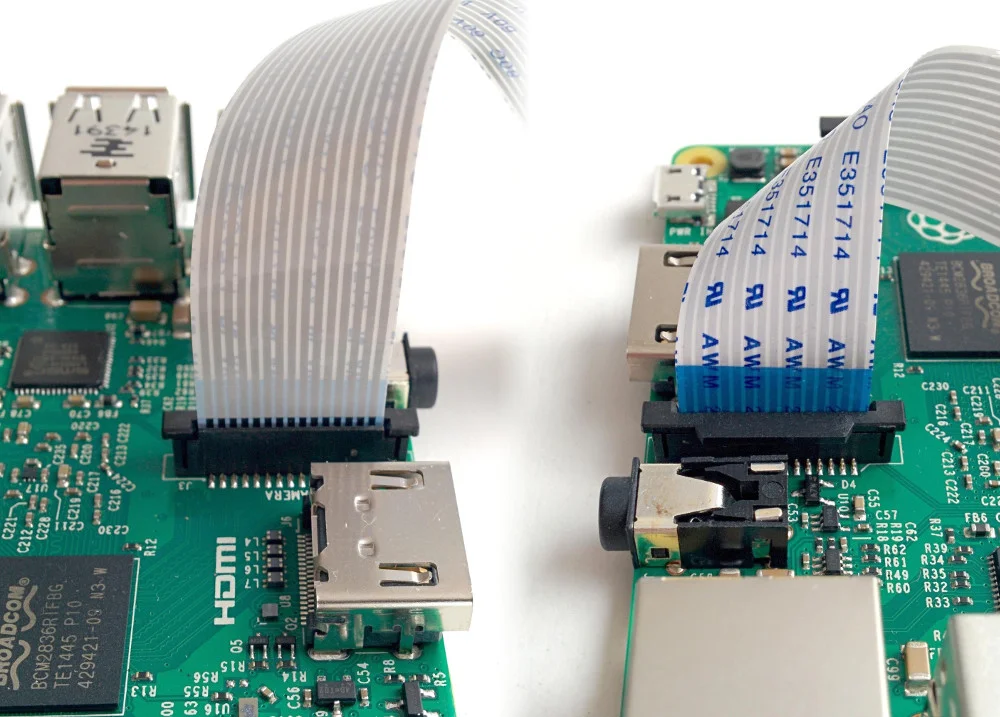
Dave Jones, CC BY-SA
Ensure the camera software is enabled in the Raspberry Pi Configuration tool:

Test your camera by opening a terminal window and entering raspistill -k. This will show you a camera preview on the monitor. If you’re connected via SSH or VNC, this will be shown on the Pi’s monitor, not yours. Press Ctrl + C to exit the preview.
Python
Although you can control the camera using the command-line interface raspistill, using the Python picamera module is much easier and allows you to change the camera controls dynamically in real time—ideal for projects.
Open the Python 3 editor, IDLE, create a new file and type the following code:
from picamera import PiCamera
from time import sleep

camera = PiCamera()

camera.start_preview()
sleep(3)
camera.capture('/home/pi/Desktop/image.jpg')
camera.stop_preview()
Now run the code and it should show the preview for three seconds before capturing a photo. The photo will be saved on your desktop, and you should see an icon with a thumbnail appear right away. Double-click the icon on your desktop to see the picture.
You can manipulate the camera object in various ways. You can alter the brightness and contrast with values between 0 and 100: camera.brightness = 70 camera.contrast = 40 You can add text to the image with: camera.annotate_text = “Hello world" You can alter the image effect with: camera.image_effect = “colorswap" Also try out effects, such as sketch, negative, and emboss. A list of effects is provided in camera.IMAGE_EFFECTS, which you can loop over and makes a great demo:
camera.start_preview()
for effect in camera.IMAGE_EFFECTS:
    camera.image_effect = effect
    camera.annotate_text = effect
    sleep(5)
camera.stop_preview()
There are many more attributes you can alter, such as resolution, zoom, ISO, white-balance modes, and exposure modes. See the picamera documentation for more details.
Video
Recording video is just as easy—simply use the methods start_recording() and stop_recording():
camera.start_preview()
camera.start_recording('/home/pi/video.h264')
sleep(10)
camera.stop_recording()
camera.stop_preview()
Then play back using omxplayer. Note the video may play back at a higher frame rate than was recorded.
Infrared
The Raspberry Pi infrared camera (Pi NoIR) was made especially because people were buying the regular camera and taking it apart to remove the infrared filter—with varying success—so the Foundation decided to produce a special camera without the infrared filter. The API works exactly the same, and in visible light, pictures will appear mostly normal, but they can also see infrared light, allowing capturing and recording at night.

This is great for wildlife cameras, such as the Naturebytes kit, projects like the infrared bird box, and various security camera projects. The IR camera has even been used to monitor penguins in Antarctica.
Also the camera can be used to monitor the health of green plants.
Pi Zero
When the $5 Pi Zero was announced last year, it did not feature a camera connector due to its bare bones minimalist nature; however, last month a new version of the Zero was announced, which added a camera port.

The connector is smaller than the regular one. In fact, the same connector is used on the compute module, but a cable can be used to connect a camera. Both spins—visible and infrared—and both versions (V1 and V2) work with the new Pi Zero.
More ideas
There’s plenty more to read up on what you can do with the camera module, and why not tie in with some GPIO for more physical computing projects?
[ad_2]
Source link