https://i.ytimg.com/vi/D-9nwtPKbUk/hqdefault.jpg
View the full text summary and download the files used here: http://www.blenderguru.com/videos/how-to-create-a-post-apocalyptic-environment/
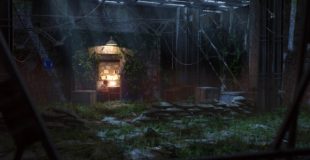
In this tutorial you will discover how to:
-Add Grunge Textures (13:25)
-Add Graffiti (22:42)
-Add Debris (34:47)
-Grow Ivys (50:20)
-Add fog (1:03:35)
source
31 responses to “How to Create a Post Apocalyptic Scene in Blender”
for the missing textures just copy the links from blender when you load it up and download them
Can you please add the ivy and plant DL's form you video? The link is dead.
I added my own textures but all the textures are missing from Miss. SIntel ? Anywhere I can find them ?
I know this is an old video but I hope someone can still help me I pressed render image to see how my image would look and the whole image is purple is there some way to fix this problem?
The files aren't there 🙁
haha…this post apocalyptic? hahaha………….. hahaha…………..
When i render mine its just purple
May I know where you get most of your assets?
1,154 people are willing to admit that they hit the numkey on accident. 10 are in denial that they also do so.
I've only been using blender for a few months now, and I gotta say, "Why did I wait so long to pick this thing up?!" I've sculpted a few of my comic book characters, created an awesome exploded moon scene surrounded by an asteroid belt, and it's all thanks to great people like you who make learning this program so easy!!! Had to do a lot of research and experimentation to get the particles to spin around the moon and randomly on their own axis, but needless to say, it's turned out great! The more I learn, the more ideas flood my mind on how to add cool effects and piece together tricks from all sorts of sources to do even cooler things! Then I found out you can use nvidea cards to speed up renders, and I just so happen to have one. Winning! lol So thanks again for all you do. Many people would choose to keep their secrets just that… Secrets, but this blender community is not like that at all!!! Much love to you all, and keep creating the awesomeness!!!
41:27 The term ''Numb Lock'' applies to a great many things in life…
…NO; it is NOT limited to just using the keyboard and YES I trip over it now and then.
This reminds me of The Last Of Us.
I thank you with my life, for showing me this Ivy feature ! 😀
when i rendered the scene the entire image was purple idk what i should do
Can this be used in unity?
The debris could possibly be made looking really cool by using physics to destribute it realistically and then bake the geometry. Just an idea.
Great tutorial. Can you do a tutorial on creating a wear house like this, and all the textures and models in it?
Is blender a level editor? I am new into these things. To me it seems that you create a scene/level in blender and then import that into a game engine like Unity and Cryengine.
Damn it!!!!!! I pass more than 2 month on my textures!!! unwrapping everything! painting everysingle textures!
Damn it!!!
I Gotta learn how to use blender…………
is there a way to have that fog only cover the ground & using the Z depth?
Gr8 Tut!
there's a lot of wana b's teachers out here, You're not one of them AnDrew!
Andrew about Tutorial's lengths:
If you were having a 3 hrs Tut. I'd be there until the end!
Rock & Roll Guru! It's all Good!
I'm kind of a noob at this, so i don't know how you even get that picture into blender, how do you do that? XP
i always hit the num key when im roatating stuff. I HATE THAT D:<
Awesome Tutorial! I got one problem though: The "fog" is not getting rendered. I can see it being applied in the compositor through the viewer node, but the fog won't appear in my final render result… any advice?
Very impressive. Thank you.
AWESOME! Sir.
thanks "again"
Is this too much detail for a video game?
I have just started the tutorial but when I rendered it(cycles) everything is a bright purple. I've checked the lamp, material and world colours and none of them are purple.Please help
Superb!! really cool, I never thought that blender can produce this kinda result with this interactive rendering !! really good tutorial Thanks 😉