https://i.ytimg.com/vi/6Bkj-nHZlac/hqdefault.jpg
Get the latest version of Photoshop CC here: http://bit.ly/2ekhRiF
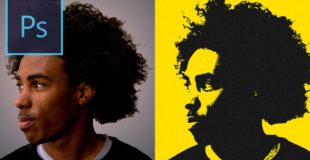
In this Adobe Photoshop Tutorial, I will be using Photoshop CC to demonstrate how to quickly create a textured pop art photo effect.
Steps:
1. Convert your layer to a smart object and apply a threshold adjustment.
2. FIll in unwanted portions with white on a new layer
3. Add a new gradient map adjustment layer with a color combo of your choice.
4. Add a new texture fill layer and set it to multiply, overlay, or softlight at about 20 percent opacity. Alternatively, you can use a stock texture photo like concrete or a wall.
Try it out with a color combo and a texture of your own!
————————————————————–
SUBSCRIBE on Youtube for new videos!
– http://bit.ly/Justinodisho
FOLLOW ME ON SOCIAL MEDIA
– Instagram: https://www.instagram.com/JustinOdisho
– Twitter: https://twitter.com/JustinOdisho
– Facebook: https://www.facebook.com/JustinOdisho
VISIT MY WEBSITE
– http://justinodisho.com/
—(F.A.Q.) Frequently Asked Questions—
Where to get Photoshop, Lightroom, Premiere Pro etc. ?
➜ Get Adobe Creative Cloud: http://bit.ly/2ekhRiF
All of the Tech & Camera Gear I Use:
➜ List of My Gear: http://amzn.to/2dUzfeC
Thanks for watching!
(Affiliates: Adobe, Amazon)
View Original Source Here
35 responses to “Photoshop CC Tutorial: How to create a textured Pop Art Photo Effect (Easy & Quick!)”
Good job… thanks
Great info..BUT PLEASE SLOW DOWN..we are not all as familiar with where everything in the programme is and we are not all experts…
can you post a link to the picture. love the video.
this was awesome, thank you
great work. worked on m pic perfectly
Thankyou, this is the easiest Pop art way that I have crossed. I like how I didn't have to paint in the picture to change colors in certain areas. It is crisper and cleaner looking. TY
your voice sounds like tyler from twenty one pilots!!!!
wow this frame rate is just glorious
thanks for explainging g
can this be done with 3 or more colours ?
could you also make a video on how to cartoonize your own photo
Thank you very much justin !
Awesome 👍
Thank you very much
Thank You!
Simple and fun
it helps a lot. Thank you very much for sharing.
Good video, thanks for the knowledge!
Awesome.
Love it!.
Nice tutorial. Easy to understand. Thanks! ☺
pessimo video pau no seus cu
My image turns out too jagged. Is there a way to smoothen the transition between the black and white?
Justin! You da man!
Thank you for this very helpful tutorial 🙂
If anyone is getting an error where the picture is filling in more detail than the preview shows. you can fix this by sizing down your photo. This effect works better on canvases that are 7" tall (from my experience).
Thanks this tutorial was GREAT!!
Awesome! Thanks
Every time I change the white to a color, it turns gray.
Awesome channel!!! Congrats:D
help i convert it into smart objest but its not letting me click threshold
my fish ran away. thanks
Loved this ! Super Helpful!
ur da best! thanks.
Great work, how come when I convert mine to a smart object I can't select the treshold
Awsome, got an A grade with this 👌🏾