[ad_1]
Producing high-quality headshots in high volumes can be a daunting task. However, with over 6,000 headshots produced annually, we have cracked a code to high-volume headshot success. We know firsthand how challenging it can be to work efficiently without sacrificing quality.
With the right processes and workflow, high-volume headshots can be made efficiently without sacrificing quality and, simultaneously, be a great source of revenue. Read on to learn our secrets for producing top-notch headshots quickly and repeatedly.
What are High-Volume Headshots?
Let’s start with defining what we understand by high-volume headshots. For us, high-volume headshots are when we have to photograph more than 20-30 people in about 10 minutes or less per person. The best examples of high-volume headshots are during corporate events, training days, headshot days at schools and universities, conferences, or any other occasion when many people need their headshots taken quickly and efficiently.

Do high-volume headshots feel like you are walking on fire with your eyes closed? Only if you don’t properly prepare for what you are about to take on. In this article, we will share our top advice on the following:
- The five familiar challenges and solutions to high-volume headshots
- The best lighting setups based on the number of people that will get their headshot
- Our headshot process includes tips, tricks, and secrets
- Gear recommendations on what has worked best for us and why
- How to prepare for your next high-volume job with our photo gear checklist
Top 5 Common Challenges and Solutions

High-volume jobs can bring some unique challenges. We have lived through these challenges firsthand. The most common challenges are:
- Efficiency
- Space constraints
- Consistent lighting
- Poses and facial expressions
- Foolproof technology
1. Efficiency
High-volume headshots differ significantly from in-studio sessions when we have plenty of time to perfect the lighting, posing, and expressions. When photographing, a large number of people process inefficiencies will make your life much harder, your client less happy, and potentially not provide properly contracted services. High-volume headshots require speed and efficiency to capture everyone who needs to have their headshot within the allotted time limit without hiccups.

Over the years, we learned that the vital efficiency killers are:
- Inconsistent processes to photograph each person
- Lighting that requires more extensive adjustments for each person
- The disorganized flow of people
- Flash misfires
- Unreliable tethering cables
- Slow computers
- Slow USB ports
- Terrible WIFI
- Unreliable software
Solution: Processes for Efficiency While Keeping the Quality of the Headshots
Being efficient with workflow means having structure moving people through the photo setup quickly. The most important way to do this is to develop a process that defines all the steps from the moment a person comes to get their picture taken to the last stage of the person receiving their headshots. This whole process is often 5-10 minutes from start to finish.

When photographing a high volume of people, don’t be trigger-happy. We capture 6-8 photos per person for the highest volume jobs. With those photos, we want to ensure each headshot is slightly different to provide the best variety. The difference can be in posing, facial expression, or both. At the minimum, we take 3-4 photos straight on and 2-4 headshots with feet at a slight angle.
Providing, on average, 6-8 photos per person keeps the line flowing fast and steady. It makes exporting the images much quicker and helps control each person’s time at the kiosk selecting their pictures. The more photo options a person must choose, the longer it will take to decide, potentially slowing down the flow. We use Simple Photo Share for people to select and receive headshots. This platform allows you to send up to 8 photos at a time.

A well-defined workflow will ensure everyone goes through the process consistently and receive the best experience without feeling rushed or overwhelmed.
We will talk about our lighting setups later, but the most crucial decision to make when designing your light setup is how fast and easy it is to adjust for each person based on their height, skin tone, glasses, and hairstyle.
Research and invest in reliable gear. When photographing high-volume headshots, there is no room for any equipment to misbehave. Unfortunately, the most reliable equipment is often not the cheapest. We will talk more about our gear in the gear section.

Besides reliability, it is equally important that your gear is easy to pack and set up. When we decide on equipment, our goal is to be able to pack everything into three bags and set up everything in 60-90 min. You must practice multiple times before the event to efficiently set up everything. Once you do it 5+ times, it will become second nature to put everything together and even faster to tear it down and pack.
We have practiced our different setups an infinite number of times. It can feel like the Karate Kid moment where Daniel’s training “wax on, wax off” seems tedious now, but in the end, it pays off when everything runs smoothly.
If photographing employees for a corporate event, we encourage our clients to add on the scheduling system to schedule the time slots in advance for their employees. We use Acuity online appointment scheduling. This system sends a reminder 24 hours before the planned timeslot with where we will be meeting and a style guide on tips for what to wear for their headshot.
2. Space Constraints
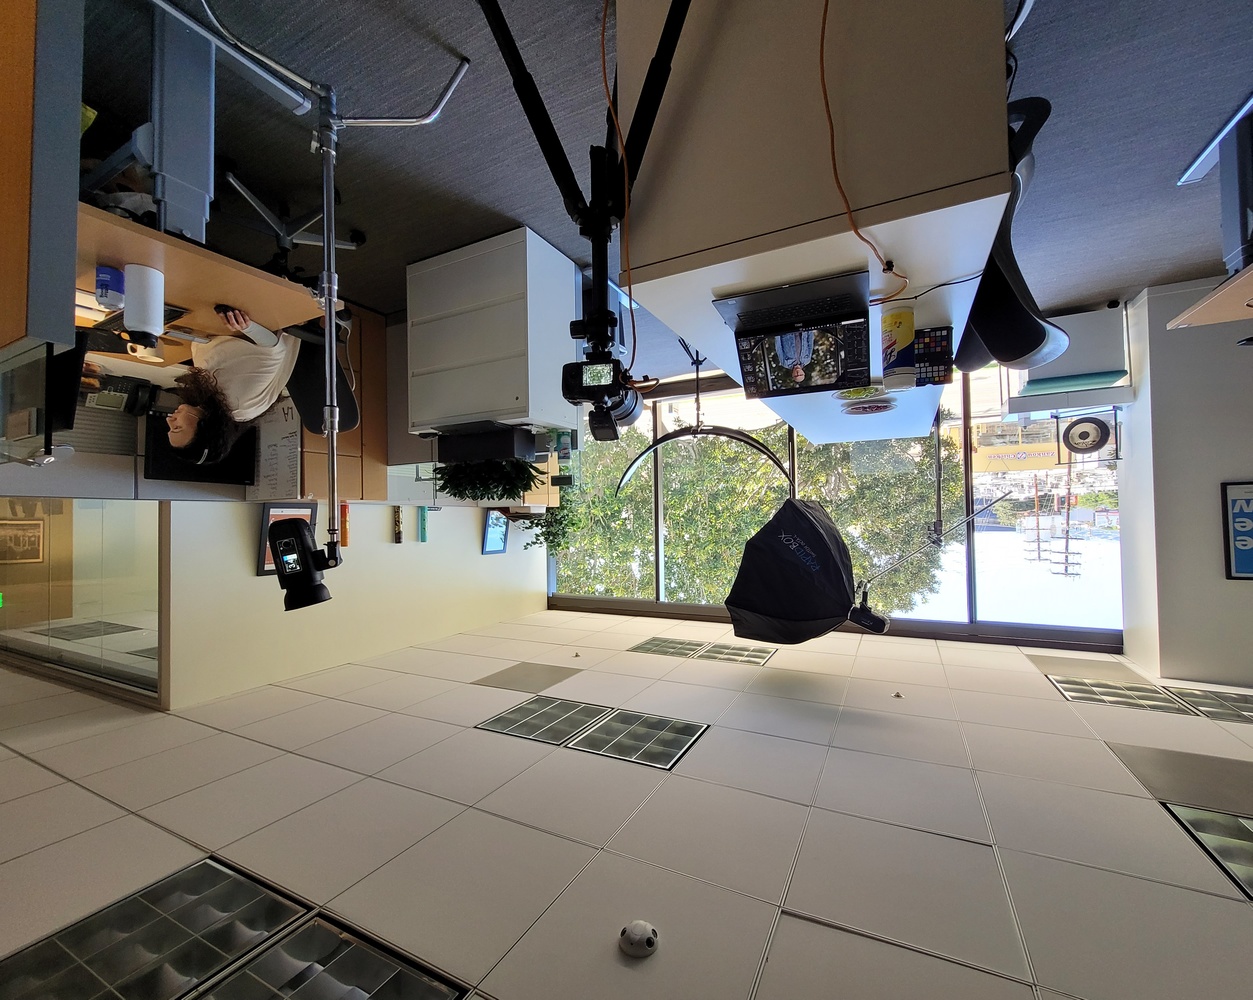
Sometimes the stars align, and you get a spacious room to set up the portable studio. However, you must often be ready to set up in much smaller spaces. We communicate with our clients ahead of time to make sure they understand we need at least a 10×10 open space. Make sure your clients understand what open space means to you. For example, a room with a vast boardroom table in the middle that’s impossible to move is not considered an open space.
Solution: Communicate All the Details Ahead of Time
We have experienced all types of workspaces. For example, there were many times the space we had to work in needed to be more varied, and we had to remove the tile ceiling to make our lighting work in the work area we set up in or to have our camera pressed against the wall.
If photographing for a corporate client, we ask for a more secluded space with minimal foot traffic. Private areas are beneficial so that the person in front of the camera can feel more comfortable. In addition, only some people want or feel pleased to have their photos taken before their co-workers.
Having a room with minimal foot traffic is to our advantage because it is easier to give directions when photographing. In addition, secluded areas ensure clarity with the client because, in a louder environment, they cannot hear the advice on how to pose. Also, having other people around makes it much harder to have eye contact with the person you are photographing.

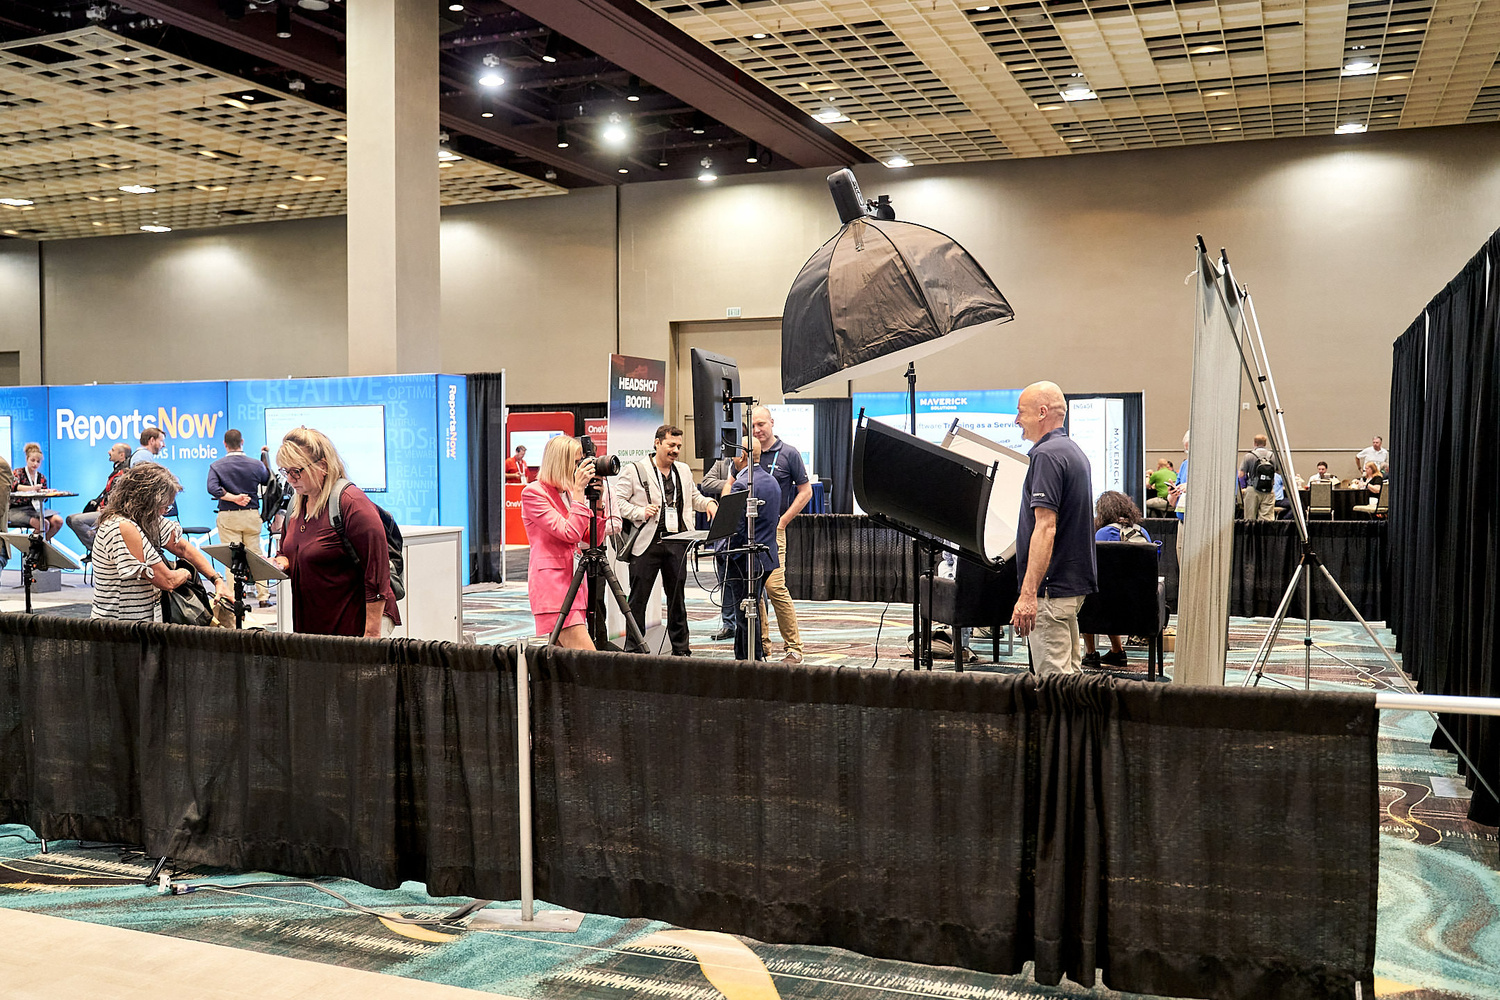
The smallest setup we can work in is a 10×10 area when working at a tradeshow. Anything smaller becomes challenging. There were some instances when we had to photograph in a smaller space and use a shorter lens (not optimal for headshots). Also, our tripod was sticking out slightly from the booth. It is important to note that some conferences are extremely strict about crossing the border of the assigned booth space. We still live on the edge and cross that line but are mindful of it.
Whether it is a bigger or smaller space, we have learned our lesson to pack compact gear. Taking compact equipment with us makes the process much easier and allows us to stack our gear conveniently behind a booth curtain
3. Consistent Lighting
Consistency is a big challenge in photography. When somebody comes to our studio, we have the flexibility of tweaking the lighting because we work with a different time limit.

When working with high-volume headshots, the goal is consistent lighting without making any significant lighting adjustments. Each person is well-lit. It’s equally important that each person is well-lit and looks consistent across the whole group of photos. In small places, we bring the light closer to the person we photograph. That’s why even the slightest movement may create lighting variations.
Regarding posing, we need a flow of flattering poses for most people, regardless of their body types.
Solution: Have a Process in Place for Consistent Lighting and Posing
With higher-volume headshots, the lighting setup needs to be forgiving and easily adjustable from person to person. Therefore, we use a version of clamshell lighting for the highest-volume projects and two strip-light configurations for slightly lower-volume engagements.

We recommend simplifying the lighting. High-volume headshot lighting must be easily adjustable and forgiving for the highest-volume jobs. Usually, forgivable light is less attractive (flatter), so we focus on lighting simplicity.
Our Version of Clamshell Lighting is:
- One large octa from above pointed down and slightly angled toward the person.
- Eyelighter reflector below to open the shadows under the chin.
- Optional two lights on the backdrop.
Benefits of this setup:
- It is a quick setup with only one light that needs to be adjusted.
- With our Cambo boom, we can change the light without changing the light stand.
- Smaller chance of misfiring because there is only one light main light.
The imperfection of this setup:
- It requires a higher ceiling to fit the strobe and softbox from above.
- It doesn’t give great pop in the eyes since the light is coming from above and down.
- It may be challenging for people with deep eye sockets.
- The initial setup requires more strength to lift the boom.
- Cambo boom requires a 15lbs weight bag, so your setup automatically becomes heavier.
Two strip lights setup:
- One strip light is in a straight vertical position pointing at the subject.
- The second strip light at 45 degrees, slightly above the person.
- Eyelighter reflector below to open the shadows.
- Optional two lights on the backdrop.
Benefits of this setup:
- More flattering light because it fills the skin lines better. The face lines are less visible straight from the camera.
- More pop in the eyes, even for people with deeper eye sockets.
The imperfection of this setup:
- You will have to adjust two lights potentially for each person.
- More work to keep the light consistent from person to person.
- Two main lights, so there is a higher chance of misfire.
We often add direct lighting to the backdrop for a consistent look. However, when relying solely on the light spilling from the main lights, the backdrop color and brightness will not be consistent as the angle of the light slightly varies from person to person.
Placement of lights onto backdrop:
- One light on each side of the backdrop. Feather the light into the opposite side as much as possible. Ensure the lighting from the back does not spill into the person you photograph. If it does, you should point the light more toward the center. It might sound rebellious, but the distance from the backdrop does not matter.
- The only disadvantage of this setup is the addition of two flashes which can cause other misfires.
Whether you photograph in an office, hotel, or conference center, there is usually a high level of wi-fi/signal “noise.” That “noise” interferes with the signal the light trigger sends to the strobes. So you can reduce the number of misfires you encounter, selecting the right channel through which the trigger communicates to the strobes is critical. Most modern systems have the functionality to recommend the “cleanest” channels. Always make sure you select one of the recommended channels. Working with recommended channels reduces frustration levels associated with flash misfires.
4. Poses and facial expressions

One of the biggest challenges we hear from other photographers is how to pose people, especially when we need more time and work with different body types.
Solution: Limited posting options with clear Do’s and Don’ts
We have a system for a workflow of poses that will be flattering for most body types. When taking 6-8 photos per person, we explore all sides of an individual’s face.
Posing Recommendations:
- Usually, the face straight toward the camera works best with the most significant number of people.
- The subject can turn their feet left and right, but the face is usually always straight on.
- One of the things we learned from Peter Hurley was to push the forehead forward to create a better jawline definition. We do it on every person we photograph, even for high-volume jobs.
- Many people tend to hold their breath in front of the camera. Have a few methods to make the subject feel at ease in your few moments together. Add in some cool Mom/Dad jokes. For example, “What do you call a bear with no teeth?” Ready for the answer?” A gummy bear!”
- Another great tool to have in your pocket is Peter Hurley’s “hurleyisms.” We attach our phone somewhere we can see it or do our best to memorize a few of the best ones, and when we are stuck with what to say, we open the app up on our phone, and there is always something hilarious to yell out to the person you are photographing.
Posing DON’Ts:
- Do not let people sit when being photographed. The spine automatically collapses when we sit and make our posture look slouched.
- Please do not ask the person to lean forward with their upper body, mainly because we do not photograph headshots from above.
- Unless you go for 90’s glamour, do not instruct the person to drop their front shoulder.
- Do not lean the face toward the shoulder closest to the camera. In most cases, it is not flattering, especially in the neck area.
5. Fool Proof Technology
Most of us have been in a situation where something stops working during a photo session. Whether our flashes stop firing, the camera freezes, or the photos stop transferring. It is embarrassing and causes delays.
When working with high-volume headshots, there is no room for errors or slip-ups. Therefore, it is critical to check and test all the gear and master photography setups before going on location for a client.
Grant Cardone says it best in his book The 10X Rule, “Never take the position that things just happen to you; rather, they happen because of something you did or did not do.”
In other words, we must be active with our gear checks. If something stops working during a shoot, we always have double, if not triple, backups of things, and on top of that, a ‘plan B’ is set in place for worst-case scenarios.
Solution: Prepare & Plan at least one month in advance
Prepare and test all your gear well in advance, so there’s enough time to take care of it if you need a repair or replacement. When deciding which items to have backups for, we check how easy it would be to photograph without them. So, for example, if our tripod breaks, we can always handhold the camera. That’s why we do not have a backup tripod.
If one of our backdrop lights stops working, we can still light up the backdrop with just one light. So that’s why we have one extra light for the backdrop.
However, if our leading light breaks, we cannot operate. That’s why we always have strobe backups and primary light modifier backups.
During the first few conferences we photographed, we used software for our kiosks that worked ok for 50-100 photos but would fail when we had 500-1000+ photos. That was so embarrassing. Every 90 min, we had to reset it. Nowadays, we use Simple Photo Share, which works reliably and efficiently.

In the beginning, we learned this the hard way. We did not know that the WIFI could be better at some conference centers, and it costs a lot to purchase the upgraded WIFI.
We find out about the WIFI situation in advance and discuss the action plan. At some conferences, booths have already purchased their WIFI to help you connect and be efficient. If not, we will buy the WIFI plan at the conference center to ensure smooth connections. Our plan B for WIFI failure is to have our hotspot for additional backup.
Besides WIFI, another factor that can slow down the process is slow and unreliable gear. So another lesson we had to learn is to invest in gear that makes us fast, efficient, and reliable. Every piece of equipment we use has we test out more times than we would like to share.
Writing this section makes me sick to my stomach thinking about our difficult moments, from our flashes misfiring to photos not transferring properly to our photo-sharing kiosks or the attendees never receiving their images.
Learn from our painful lessons, and you will not have nightmares of dealing with clients in your sleep while in your pajamas in bed.
High-volume headshot process
High-volume headshots are not just the number of people we photograph; it depends on how many people we photograph per hour. A general rule is that if we have ten minutes or less per person, it is considered high volume.
Step 1: Setting up your portable studio
Know the space you will work in ahead of time. Knowing the kind of area, you will work in helps pack all the appropriate gear. If it is a drivable location from where we live, we arrive at least 2 hours before the event starts. When traveling out of state, coming at least one day before the event is essential. There is no room to take chances with canceled flights.
After you have set up your headshot booth, it is time to test everything out (even though you’ve tested a gazillion times before). Everything must work, from the lighting to the photo transfer of kiosks (if you decide to include it).
We run the kiosks on iPads, allowing people to select their headshots on the spot. If it is high volume with no additional retouching, we use Simple Photo Share. Events are easy to create with custom email templates. This platform allows photos to be emailed or texted (the number cannot be international). The images are delivered within seconds after the headshots are selected.
If we are working with a client that wants retouched photos for each person, we use Capture One Live. Capture One Live makes it easy for each person to see their headshot right after we photograph them on an iPad. In addition, they can select which photo they would like to have retouched, which instantly appears in our Capture One session.
It is essential to take multiple test shots and send them through to ensure the photos appear with whichever photo-sharing method you choose.
Step 2: Go over the game plan.
When working with team members or team members of the booth, we discuss a plan of action with the roles of each person before we start to photograph. Having a plan in place of how to work with line control, making sure all the information is collected from each person in line, whether they have VIPs that need extra attention, and the guidance to provide when assisting in the headshot photo selection is all crucial for things to run smoothly.
Step 3: Ready to photograph.
If photographing for a corporate client, it is optimal for each person to schedule their headshot ahead of time. A custom scheduling system is something we offer as an add-on. Having each person plan their headshot helps keep things organized and is great for time management. We use Acuity Scheduling.
When photographing at a conference or tradeshow, a line is formed at the booth when the doors open. Therefore, we always assign one team member to check each person waiting in line before their headshot. Checking in the attendees in line helps the booth or client we are hired by with lead generation. We also offer an add-on to name each image file with the person’s name.
Google Forms or something more sophisticated like Jot Form is conveniently accessible on a tablet for each person waiting to fill out their information before they get their headshot. The benefit of using Jot Form is that it looks better, is more customizable, and has a pure kiosk mode setting.
Tips on how to keep the line moving & have a constant flow of people
Part of the planning process is discussing with the organizers what formation they want to have when a line of people starts forming. For example, at conferences, the point of having a line at a booth is not only for the booth to be busy but also a fantastic opportunity for the company of the booth to talk about their product or service and provide extra value for the people waiting in line.
Typically, there are nonstop lines when we photograph at a conference. However, if things slow down because of lunch or other classes, it is customary to reach out to the people walking by to ask whether they would like a professional headshot.

Tools we recommend and why they work efficiently on location
Kip’s Wedding Song from Napoleon Dynamite describes how we feel about our gear the best, “Yes, I love technology…but not as much as you, you see…but I still love technology always and forever.”
Most of the gear we use for high-volume headshots is compact, light, and reliable. We have double, if not triple, all our equipment. We love technology and dedicate a reasonable amount of time to testing and researching what works best for us.
Computers & Tablets
- It is essential to have a fast laptop that has a high-speed processor and a good amount of RAM. We currently use MacBook Pro’s M1Max with 64GB of RAM. If you have 32GB of RAM, that should be sufficient.
- We recommend having the fastest possible USB ports on the computer. Either Thunderbolt or USB 3.2 are the best options.
- We use tablets for our clients to select their photos on the spot after getting their headshots taken. We found that Apple products work better without glitches for most of our programs. We have apple iPads and, for emergency backup, a couple of window tablets. There is no need to buy a new iPad; older iPads work perfectly. It’s more important to get those with a bigger screen. We found them on Amazon for about $300.
- We always put our laptop on top of the Tether Tools Aero Table that easily attaches to any light stand. It is compact and is travel friendly. We use it both in our studio and on location.
Cameras/Lenses & Tethering
- There are so many brands of cameras out there. The most important feature is a fast USB port, anything from USBC 3.1 or 3.2. We use Canon mirrorless cameras. Whatever brand you use, bring multiple backups in case something happens to your primary camera.
- For high volume, headshots don’t go with the highest megapixel cameras. For example, we have both Canon R5 and R6 and always photograph high volume with the Canon R6 body. Smaller files transfer faster to our laptops and export in less time. Also, we shoot in CRAW format, creating 50% smaller files.
- For the lens, we use the RF 85mm 1.2 Canon lens. It is super sharp, fast focusing, and lets us be close to the person we photograph. It is beneficial, especially at busy venues where people need to hear us better.
- The famous Tether Tools USB cables are a big part of our workflow because they offer the best transfer speed and reliability. We also use a Tether Guard to secure the cable to the laptop table and the camera.

Lights & Modifiers
- We use FJ400s for our leading lights. They provide us with enough power, are well-built, and are reliable. We like that FJ400s are battery-powered but can be AC-powered without additional gear. Plug in the cable, and you are all set. We can shoot practically a full day of high-volume headshots on a fully charged battery.
- For the background light, we use FJ200s. These lights are very compact and have enough power.
- We use Westcott Rapid boxes for modifiers because they are the easiest and fastest to open and set up and are travel friendly.
- When we use a reflector, we use the Westcott Eyelighter. It is compact and easy to pack, and we like the wrap-around fill it provides
Backdrops & Stands
- For backdrops, we use Westcott X-drop Pro – there offer two sizes, and we use either depending on the location we are working and the space we have to set up. The X-Drop Pro is built much better than the previous version, so it’s safe to pack them in our rolling cases. The material backdrop is easy to pack and travels well. The X-Drop Pro has a minimal footprint, so it’s easy to set up even in small spaces.
- For central light stands, we use Matthews c-stands. Yes, they are heavy and expensive, but they are solid, smooth to operate, and simply the best. For the Eyelighter, we use the Westcott compact light stand. It is compact, lightweight, and efficiently set up at a low height.
- The Cambo Boom is a beast to travel with, but it is so easy and efficient to adjust the lighting once it is set up and ready to go.
- Hurley Pro-weight bags by Westcott are a must-have for us when traveling. You can fill the bags with water and dump them when you finish. Forget about dragging sandbags around with you.
Rolling Cases
- Tenba Transport Air Case Attache 3220W
- It is a substantial rolling case that is like a tank. You can stand on top of this bag without any destruction. It is safe enough to check this bag in at the airport.
- We put our cameras, lenses, strobes, cables, triggers, batteries, x-rite color checker, and other necessary backup gear.
- One or two Tenba 48 inches rolling cases
- We use this bag for our light stands, modifiers, more cables, extension cords (we prefer braided extension cords because they are softer and do not tangle as much), gaffer tape, and other accessories we might throw in at the last minute. Tenba 48-inch rolling cases are also excellent bags to check in when flying.
Software & other accessories
- Capture One for raw processing. It is reliable for tethering, and we like how it renders skin tones.
- Capture One Live for client photo selection. We use this when photographing clients wanting all the selected photos to go through additional retouching.
- JotForm for lead capture. Google Sheets allow naming each file of the person you are photographing quickly.
- Simple Photo Share is a platform for our kiosks that allows people to select the photos they want and quickly email or text the images to themselves.
Photo gear checklist
We are happy to share the checklist we use when packing our gear to make the process easy and efficient. You can request a copy here: https://mailchi.mp/wasiophotography/headshot-checklist
Create a system that works for you!
We have learned these tips and secrets over the years of working with high-volume headshots.
For high-volume work, the biggest takeaway is looking at every step of the workflow and figuring out how to minimize the time and effort that goes into it. There are many ways to accomplish this. Be aware that even the slightest changes in each headshot setup will result in significant gains overall.
If you have any tips or tricks you have learned that we didn’t cover, we would love to learn about them. So comment below to share your secrets to success with high-volume jobs.
[ad_2]
Original Source Link