Check out another of my videos: “BREAKDOWN: Select and Mask vs. Refine Edge – Photoshop CC”
-~-~~-~~~-~~-~-
Written tutorial and downloadable files are HERE: http://tutvid.com/photoshop/ultimate-guide-beauty-retouching-frequency-separation-photoshop
INSTAGRAM & MORE:
http://instagram.com/tutvid
Tweets by tutvid
https://www.facebook.com/tutvid
DESCRIPTION:
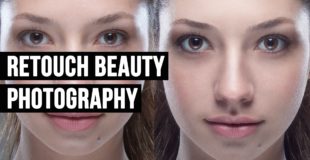
This tutorial is all about beauty retouching and how to use adjustment layers, lighting, dodging and burning, and frequency separation to create stunning skin tones and textures for a true beauty photography retouch. This tutorial should work just fine with most versions of Photoshop and you can even download the RAW file I’m using and follow along as we move through the tutorial!
Original source

46 responses to “The Ultimate Beauty Retouching Photoshop Tutorial”
Dude. Greaty vid. 10 sheets of notes. Please slow down next vid. thanks anyway.
You are very generous! Thank you. I am getting into architectural photography. Do you have any videos or courses using photoshop for that type of photography?
amazing!!! this is so valuable! thank you so much for providing the files to follow along with!
this is freeking awesome. just watched the whole video. my mind is blown away. Editing one photo is enough but what if you have to do all that effects to say 20 photos. thanks bro. ur a genius.
MINDBLOWING! Thanrs a lot for sharing this awesome technique!!
Man you are awesome.. 😘😘😘😘
i love u man <3
Just a note on your eye retouch. You refer to the white of the eye as the retina. You can't see the retina…it is in the back of the eye. The white of the eye is called the sclera. I did like the way you presented each part. Thank you for an excellent tutorial.
Great…!!
I bought this tut and now its free?
Is this rlly all for free. I started lovin retouchin n took it seriously only bcos of u. U r so generous. This step by step process helps us to understand wat v hv do next. Thank you soooooooo much
nice!!
That was great. I will try it out on an image.
Awesome video – thank you kindly.
Just kidding
Great tutorials, great explanations! If only you could speak faster 🙂
Excellent tutorial! Thank you!
Love it
Really ultimate Tut bro
Well explained, although I am really not a fan of blurring the skin and then adding "artificial skin texture". I think it looks a lot better if you would try to keep the natural skin texture, but that's just a matter of taste. I also like it better if there are still some small freckles, blemished, etc. (that do not have a big impact on the image quality) left, rather than editing it to perfection. I just thinks that makes it look more natural and less like a doll 🙂
I do'nt understand the first time I did this everything worked out very well! But I think somewhere my settings or something changed because after duplicating the layer in smart object for gaussian blur and make one for texture I am not able to retouch or nothing is changing when I am working in the blur layer…… not with the retouch panel or when I make something with the lasso it isnt blurring the spots but only making the lasso place darker…. can someone help me out??!
Fantastic my man!!!!! That's all I'm going to say about. thanks
Hi, thank you it is very useful! Can you tell me what camera did you use?
Very good tutorial! Thanks!
Learned more in a 55 min video than in 2 years of graphic design school.
Thank you for the video, really appreciate that.
18:50 skin add
FINALLY…..Whew!!!
Great video. I was happy with using 95% light room and 5% PS but this video inspires me to want to learn more. Thank you for this great learning tool.
Dude, you are awesome. Perfect tutorial.
18:24 How to photoshop someone to look like a tribal warrior
u are awesome man
thank's a lot
Unreal!!!
this is a GREAT GREAT tutorial,thank you so much!
This tutorial is such a joy! I watched it and applied every step alongside, my image came out great!! Can't wait to show the model! Thanks for this awesome tutorial!
literally, helped me so much
ty
I only came to this video because I like your channel, but honestly, frequency doubles the work that you have to do on a beauty image, it's easier to clean with the healing brush on a blank layer and then move on to dodge and burn and only then smooth the thing with FQ. Great use of tools anyways, I did enjoy this altogether. Great tutorials on the channel.
Thanks a lot. Great and all in one!
learning photoshop and also learning fast English listening channel! 🙂
Thank you!
One of the best videos.
By far the most thorough and complete tutorial on portrait retouching. Easy to follow. Very informative. Scott Kelby should hire you for "Kelby One"
New sub .. i humble myself and watch all .
Awesome touching beauty tutorial. Thanks, this helped my skill level.
really nice is never watch a youtube video that is almost an hour long
thanks. great amount of info easy to follow and very effective results.
Quite possibly the best tutorial I've seen!!! Thank you so much for taking us through this.