https://i.ytimg.com/vi/BJ1TBxMAK1o/hqdefault.jpg
In this tutorial you’ll learn how to use an alpha map in cycles to make something transparent in certain parts.
We’ll be making a leaf by creating an alpha map from the original leaf texture to use as a mask between a diffuse shader and a transparent shader
This tutorial assumes you have some basic knowledge of how to use Blender and cycles.
source
35 responses to “Alpha Mapping in Cycles – Blender Tutorial”
All right, I give up. Does Blender not use masks from RGB channels? I'm able to do this in Unreal and can't seem to make it display correctly in Blender. I have a RGB mask image/texture that I'd like to use to mask certain parts of the diffuse texture for certain things, and plugging in that mask image (all three RGB channels) should function as an alpha mask.
While I'm at it, does partial opacity never work in the Material view in the viewport? With alpha channels, my stuff looks great in Rendered but has white bits otherwise. Would love to be rid of those.
very very very nice tutorial…
muito bom! (very good)
Hi. This 9-minute video, reduced to just one image. You're welcome.
https://rosgar.files.wordpress.com/2012/10/blender-transparency.jpg
thanks a bunch it helped me a lot
thaaaanks
Amazing! thanks
solved my headache
(this one at least 😛 )
Hey, just wanted to say thanks for the video, I have done this before and had a huge brain-fart, and you are the only video that does it this way which is awesome 😀
Just what I was searching for and it was SHORT and sweet!
Thank you so much! Very Helpful
Thanks !
This is out of date. Cycles image textures now support Alpha which you can feed directly into the factor of the Mix Shader. You only need the main texture. You don't need to make a mask.
It's funny, I don't have any problem with the voice. And I'm a french speaker. By the way, thank you for the tip 🙂
thank you, very helpful)
You're smart and know what you're doing in Blender, but please, drink water or don't record at 2 am in the morning. Your voice is far from clear and it is very hard to understand you.
it does not work. I do what you say but i still have a white places on render. My shadow is also wrong.
seems like an old fucking man talking.. Dude it's hard to see it hearing your voice.. –'
Thank you!
i can hear then can't hear anything you're saying it sounds like your trying to talk in a sound activated minefield
Really good tutorial!
Oh happy day!!!! This is the most helpful video on Alpha Mapping in Cycles I have found. New sub!
I don't think my transparency shader is working correctly if I were to put it on it would just appear white with no transparency. Any suggestions?
Very good tutorial. Well goal. It was very helpful. 😉
Great one!
Great tips but no offence… you talk like you are dying
Thanks bro. Very helpful! 🙂
Thanks it was a big help to me now!
Hey does both sides are transparent like if you flip it over it looks the same or is there nothing there.
Great tips, but…. voice. This relaxed type, i don't know…"super-nerd speaking under table only with him self" voice is very…I mean, very annoying. If You like to improve Your speech, speak more confidently, brave, more healthy. I am hearing a lot Young people talking like before death something super vise, but this pushes away all interest. How ever – tips are useful. Big, big thanks!
thank you for this tutorial!
theres a quicker way. just save with alpha layer inside image. then use the node setup i have on my blog. bonecast.tumblr.com
oh, i realize the alpha output wasn't there yet at the time you made this haha. ignore me then! :3
you can also just use a mix shader with a diffuse bsdf and a transparent bsdf and then use the texture as the factor input – saves you the time of making an alpha map
Awesome I am going to go take pictures of random shit and put them into blender now =)
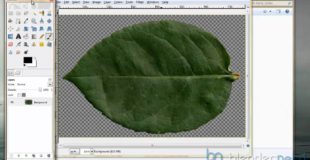
There is a much better way to create alpha map image in Gimp:
1) Load the image with transparency into Gimp.
2) Right button to the layer.
3) Select "Alpha to Selection" menu item.
4) Click on "Create new layer…".
5) Select "Foreground Colour" as "Layer Fill Type".
6) Press Ctrl+. (Control plus dot) ("fill with background colour").
7) (Optional) Delete the original image layer, and convert the created image as grayscale image.
8) Export as you wish, either jpg or png.
Done.