I got it now! Here's my clarification. The miracle begins at 3:33 starting with making a curve. He is using Pie Menus, a plug-in. Also many of his keystrokes are different. Maya? Here is 31 steps: – Create a curve path: 1. 3:33 Object mode(tab), Add curve path (shift+A not shift+ctrl+A) (do not know why he duplicates (shift-d) here)
– Make a curve point: 2. Edit mode (tab) Selecting all but one of the vertices and delete them (x), leaving ONE vertex: (shift click each, not ctrl+shift+alt click). (I hope I saved you the hour I lost to that one: it looks the same if you delete all the vertexes, but it won't work.) 3. magnet, snap to faces or edges
– Place support points on the model: 4. Shift-d place, click, repeat to place curve-points.
– stretch down to the bottom: 5. 7:05 miracle continues: select all (a) extrude (e) along Z (z) drag and confirm (enter/click) 6. Repeat #5 (e,z,enter) once to near the bottom 7. even up the bottom: scale (s) along Z (z) line up at zereo (0) (bug? fix: pivot on bounding box) 8. repeat 6 above (e,z,enter) until you have 3 new dots at the base
– Thicken: 9. 7:49 on the far right panel pick the curve tab (Data), past the wrench 10. down to "Geometry", type in Bevel Depth= 1.0 to 1.5 mm 11. back up to "Shape" fill=full
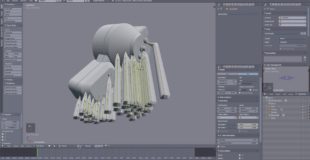
– Make a sharp pencil: 12. 8:13 unselect all (a) lasso or box (b) and select all the bottom dots 13. 8:24 grow the selection (ctrl + numpadPlus — not ctrl+3) 14. inverse (ctrl + i) to select only the top point. 15. scale in (alt + s) to make a cone point 16. inverse (ctrl+i) move-Go (g) to stretch down 17. de-select bottom points with lasso (ctrl+shift+rightMouse) or box (b, middleMouse drag) 18. Scale in (alt+s) to make narrow
– Move and bend supports: 19. 9:20 turn off snapping (magnet button) 20. Select points and move (g) lock the z (shift+z)
– Extend base with a overhanging edge: 21. 10:37 select second from bottom points (side view (numpadOne), box(b), scale (alt+s)) 22. select bottom points, scale (alt+s) but not as far
– Fill the holes in the base: 23. Object mode (tab), 24. Convert curve to mesh (alt+c) 25. edit mode (tab), select all (a) 26. Menu , select, Select Boundary loop 27. optional Zoom on selection (numpadPeriod) 28. Fill (f) — Note that this also fills in the top and makes it manifold.
– Clean up: 29. remove duplicate vertices (left panel (t), tools, mesh tools, remove, remove doubles) combine: 30. Object mode, select both model and support (shift+click), Join (Ctrl+J) 31. Edit mode (tab), Select all (a), recalculate normals (ctrl+n)
This is a feat of great import! I don't see this technique anywhere! However, I am not able to reproduce this, but I have not given up yet. Heavypoly, can you tell us key preferences? Maya? Pie menus?
9 responses to “Create 3D printing supports in Blender”
why do you add those little vertices around the mesh? I'm only half way through the video and I'm not enitrely sure what's going on with them
Please, no one ever do this. You're better off with no support
Nice tutorial, supports in Blender
ctlr 3 doesnt work for me… so stuck.
I got it now! Here's my clarification. The miracle begins at 3:33 starting with making a curve. He is using Pie Menus, a plug-in. Also many of his keystrokes are different. Maya?
Here is 31 steps:
– Create a curve path:
1. 3:33 Object mode(tab), Add curve path (shift+A not shift+ctrl+A) (do not know why he duplicates (shift-d) here)
– Make a curve point:
2. Edit mode (tab) Selecting all but one of the vertices and delete them (x), leaving ONE vertex: (shift click each, not ctrl+shift+alt click). (I hope I saved you the hour I lost to that one: it looks the same if you delete all the vertexes, but it won't work.)
3. magnet, snap to faces or edges
– Place support points on the model:
4. Shift-d place, click, repeat to place curve-points.
– stretch down to the bottom:
5. 7:05 miracle continues: select all (a) extrude (e) along Z (z) drag and confirm (enter/click)
6. Repeat #5 (e,z,enter) once to near the bottom
7. even up the bottom: scale (s) along Z (z) line up at zereo (0) (bug? fix: pivot on bounding box)
8. repeat 6 above (e,z,enter) until you have 3 new dots at the base
– Thicken:
9. 7:49 on the far right panel pick the curve tab (Data), past the wrench
10. down to "Geometry", type in Bevel Depth= 1.0 to 1.5 mm
11. back up to "Shape" fill=full
– Make a sharp pencil:
12. 8:13 unselect all (a) lasso or box (b) and select all the bottom dots
13. 8:24 grow the selection (ctrl + numpadPlus — not ctrl+3)
14. inverse (ctrl + i) to select only the top point.
15. scale in (alt + s) to make a cone point
16. inverse (ctrl+i) move-Go (g) to stretch down
17. de-select bottom points with lasso (ctrl+shift+rightMouse) or box (b, middleMouse drag)
18. Scale in (alt+s) to make narrow
– Move and bend supports:
19. 9:20 turn off snapping (magnet button)
20. Select points and move (g) lock the z (shift+z)
– Extend base with a overhanging edge:
21. 10:37 select second from bottom points (side view (numpadOne), box(b), scale (alt+s))
22. select bottom points, scale (alt+s) but not as far
– Fill the holes in the base:
23. Object mode (tab),
24. Convert curve to mesh (alt+c)
25. edit mode (tab), select all (a)
26. Menu , select, Select Boundary loop
27. optional Zoom on selection (numpadPeriod)
28. Fill (f) — Note that this also fills in the top and makes it manifold.
– Clean up:
29. remove duplicate vertices (left panel (t), tools, mesh tools, remove, remove doubles)
combine:
30. Object mode, select both model and support (shift+click), Join (Ctrl+J)
31. Edit mode (tab), Select all (a), recalculate normals (ctrl+n)
Print it!
This is a feat of great import! I don't see this technique anywhere! However, I am not able to reproduce this, but I have not given up yet. Heavypoly, can you tell us key preferences? Maya? Pie menus?
what about the thickness of the supports? are they hollow?
informative and funny. Cheers!
Someone prolly asked this before, but… do you use blender now?
Thanks.